January 22nd, 2012

Ladyfingers & tiramisu

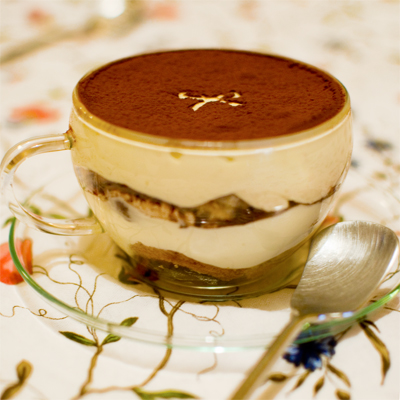
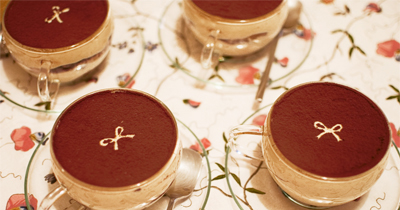
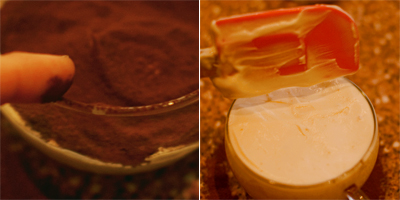
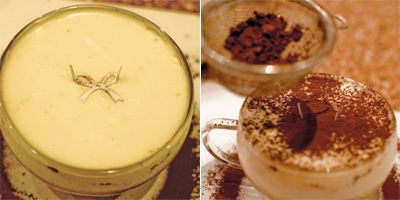
(Tiramisu in individual cup – with ribbon design stenciled.)

.

High time for another recipe! So here goes (…a long one)! ^^


x . . x . . x . . x . . x . . x . . x . . x . . x . . x . . x . . x . . x . . x . . x

.

TIRAMISU

Literally meaning ‘pick me up’, this Italian dessert is made by alternately layering coffee-dipped ladyfingers*, mascarpone mixture, & cocoa powder.

.

Interestingly, the history of tiramisu doesn’t stretch long. You’d think that such a classic Italian dessert would record back from perhaps generations of family tradition or perhaps it might have been conceptualized soon after when zabaglione was invented all the way back in 1570**. But no, although exact origin is not certain, the earliest tiramisu recipe found*** is from only less than 30 years ago.

.

There are many tiramisu recipes out there, but it mainly separates into two camps: raw-egg version or pasteurized egg version. I prefer the pasteurized version – It feels safer that way. I also prefer to use Kahlúa (Mexican coffee flavored rum based liqueur) in the cream mixture as opposed to Marsala wine, as I think it marries the coffee-soaked ladyfingers & the cream better.

.

The following recipe will make 4 & a half tea-cups of tiramisu like the picture above. Obviously, you can make it in one big dish if you prefer. And for the ladyfingers, you can ofcourse use store bought instead, but nothing beats homemade on this one! ^^ So let’s first look in to making the ladyfingers!

.

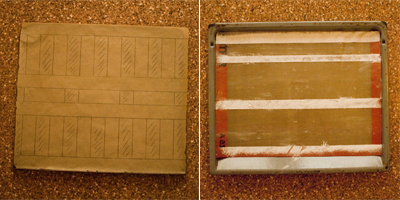
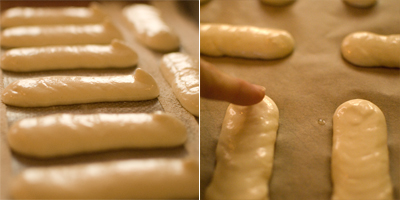
First thing we need to do is to prepare the baking surface with guide lines so that you can pipe the ladyfingers straight with the same length & thickness. – If using baking parchment sheet, use pencil & ruler. Just make sure to reverse the paper so you pipe on the surface without pencil-side. – On a Silpat, you can’t draw, so dust icing sugar instead.

.

Coco&Me - Coco & Me - www.cocoandme.com - Ladyfingers recipe

BAKING PAPER vs SILPAT

On a Silpat, the back of the ladyfinger will come out smooth & shiny. It comes out rough on baking paper. It is also easier to remove/ lift off the ladyfingers with silpat’s non-sitck surface compared to having to peel it off on baking paper. Silpat also provides even heat transfer to your baked goods. This is because the glass fibres in it increases the heat transfer. I have experimented on both sheets, & I had to add another 4 minutes to the baking time when using baking paper.

.

x . . x . . x . . x . . x . . x . . x . . x . . x . . x . . x . . x . . x . . x . . x

.

LADYFINGERS RECIPE:

Makes about 30 to 35 fingers. (Please note: for the tiramisu recipe below, you will only use half as much)

.

Ingredients:

3 medium eggs

1/8 teaspoon cream of tartar

60g icing sugar

45g cornstarch

30g icing sugar

60g plain flour

Icing sugar for dusting the top
.
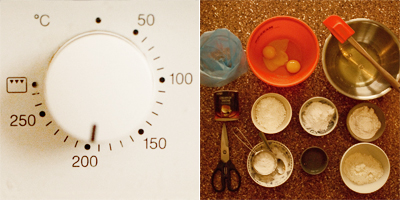
Things you need to prepare beforehand:
Piping bag
Scissors
Small fine-mesh sieve (like a tea-strainer)
Spatula
Hand mixer
Small bowl with water
Chosen baking sheet with guide grid.

.

Method:

  1. 1. Start pre-heating the oven to 220°c, as it takes a while to heat up.
  2. 2.Measure/ prepare all ingredients for smooth operation. (Separate the 3 eggs to two bowls, the egg yolks in to a small bowl & the whites to normal size bowl). Also have the piping bag & scissors ready.

Coco&Me - Coco and Me - www.cocoandme.com - Ladyfingers / tiramisu recipe

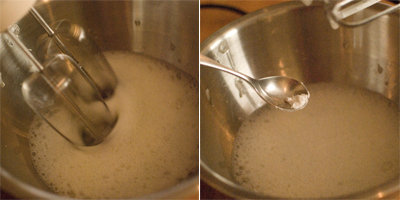
  1. 3. First, let’s make meringue. In a normal sized bowl, whip the 3 egg whites to foamy stage.
  2. 4. Add 1/8 teaspoon cream of tartar. Keep whisking.

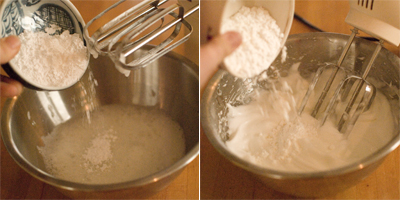
  1. 5. Next gradually add the 60g icing sugar while whisking. Whisk until soft peak stage.
  2. 6. Add 45g cornstarch & give it a final whip until hard peaks form. Leave this bowl aside for now.

  1. 7. Next, quickly go on to the small bowl with the 3 egg yolks. Dump the 30g of icing sugar, then on high speed, whip until it has tripled in volume. It should look paler & fluffier. (To avoid washing-up, just use the same whisk attachment as the one you were using to whip the egg whites!!)
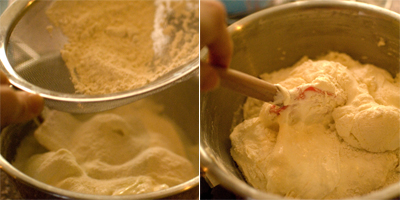
  2. 7. Spatula in the yolk mixture in to the bowl with the meringue. Fold it in roughly. (Not too much because you will be giving it a proper mix in a moment with the flour anyway!)

  1. 8. Sieve in the 60g plain flour.
  2. 9. Gently fold the mixture just until no flour remains to be seen. (Don’t over-mix!!)

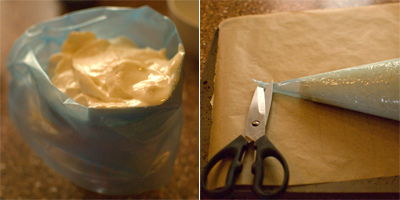
  1. 10. Place the mixture in to the piping bag & then snip off the tip so that you have a 1cm piping-hole. (Notice in the picture above that the baking sheet is reversed so we’re not piping directly on pencil marks.)

  1. 10.Slowly & precisely pipe neat lines using the guides on your baking sheet.
    (Tip on piping: Start piping about 1cm inside the guide. Squeeze the batter out until it’s a round blob & until it touches the guides. Keeping the pressure flow, gradually & slowly move the piping bag across to make a line.)
  2. 11. Your piped shapes will have a ‘kink’ sticking out where you lifted the piping bag off. So dab minimal amount of water on to your finger & press the pointy bits down very gently & smooth that bit of surface. (If you don’t do this, you will end up with ladyfingers that have burnt pointy bit.)

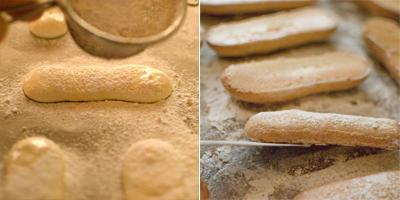
  1. 12. Sieve plenty of icing sugar on the shapes. Do this twice. (This way, you get the pearlized look, aswell as help it lift the top surface up & give it ‘feet’ around the sides just like a macaron.)
  2. 13. Bake in the pre-heated oven. Half way through baking, take it out & turn them over so that the underside becomes dry too.

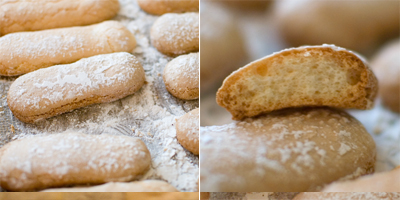
  1. 14. After about 15 minutes, lift one of the biscuits & tap the back, if it sounds hollow it is done. Take it out & let it cool on the baking tray. You can see from the picture it is baked through & is dry all the way to the middle. It’ll have a nice snap.


.

x . . x . . x . . x . . x . . x . . x . . x . . x . . x . . x . . x . . x . . x . . x

.

TIRAMISU RECIPE

.

Ingredients:

Strong coffee – cold

3g gelatin powder

30g Kahlúa

– – – – – – – – – – – – – – – – – – –

10g Kahlúa

3 egg yolks

80g sugar

250g double cream

250g mascarpone cheese

cocoa powder

.

Method:

Coco&Me - Coco & Me - www.cocoandme.com- creamy tiramisu recipe - homemade - design - individual cups

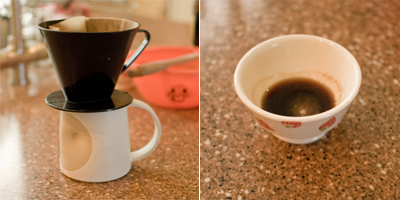
  1. 1. Make strong coffee & set aside to cool.
  2. 2. Sprinkle 3g of gelatin powder in to 30g of Kahlúa liqueur. Stir it straight away with a spoon. Set this aside. (Top tip to successfully dissolving gelatin is to add powder to liquid, not visa versa)
  3. .

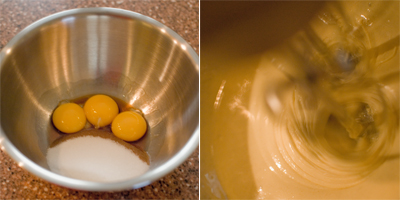
  1. 3. Next, we pasteurize the eggs: In a small mixing bowl, combine 10g Kahlúa, 3 egg yolks & 80g sugar. Put this bowl over a bain marie & bring the mixture temperature to 60°c, whisking all the time. Beat it for 3 minutes. The mixture will be fluffy & have doubled in quantity. (Note: 60°c temperature for 3 minutes destroys salmonella organisms.)
  2. 4. Microwave the Kahlúa-gelatin liquid from step 2 for 20 seconds or until the gelatin granules have dissolved. Set this aside to cool.
  3. .

  1. 5. In a separate bowl, whip the 250g double cream until it forms stiff peaks. Set aside.
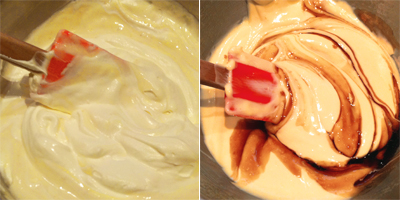
  2. 6. In another bowl, combine 250g mascapone cheese to the egg-mixture from step 3.

.

Coco&Me - Coco & Me - www.cocoandme.com- creamy tiramisu recipe - homemade - design - individual cups

  1. 7. Then fold in the whipped double cream from step 5 & the cooled gelatin from step 2.

.

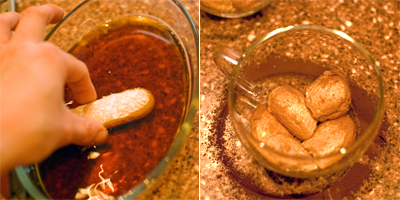
  1. 8. Have the cold coffee liquid in a shallow bowl, & one by one, soak a ladyfinger in cold coffee on both sides for one second each.
  2. 9. Align one layer.

.

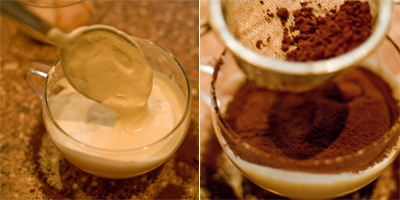
  1. 10. Layer mascapone mixture to half way.
  2. 11. Sieve cocoa powder.


.

  1. 12. Run your finger around the cup to remove excess cocoa powder.
  2. 13. Then repeat by placing another layer of coffee soaked ladyfingers, after that, cream – this time all the way to the top. Finally run your finger around the rim again to tidy up.
  3. 14. Refrigerate for 4 hours.

.

  1. 15. Sieve cocoa powder. (use a stencil to customize the top if you like!)
  2. 17. Finally, use fingertip to go around the glass rim to tidy up the cocoa powder.
  3. 18. Serve cold. Buon Appetito!!

x . . x . . x . . x . . x . . x . . x . . x . . x . . x . . x . . x . . x . . x . . x

.

* Ladyfingers are also called ‘savoiardi’ (=from Savoy) in Italian, ‘biscuits à la cuillère’ or ‘boudoirs’ in French, ‘lange vingers’ (=long fingers) in Dutch, ‘Löffelbiskuit’ (=spoon biscuit) in German. ** Detailed instruction of ‘Zambaione’ was mentioned in a cookbook called ‘Opera’ by Bartolomeo Scappi in 1570. *** Book titled I Dolci del Veneto (The Desserts of Veneto) by Giovanni Capnist in 1983. In here, it says “(Tiramisu is) a recent recipe with infinite variations from the town of Treviso” & is a “discovery of restaurants more than family tradition.”

January 17th, 2008

The ultimate crème caramel ~ creamiest & delicately soft ~

Coco&Me - The Ultimate Crème Caramel Recipe (with photographs of the process)(It’s the most creamiest, & yet most delicate Crème Caramel I’ve ever tasted in my life!)
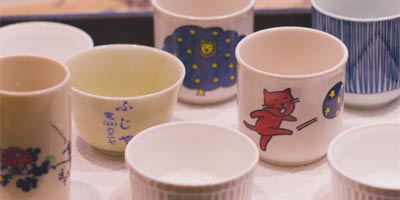
Coco&Me - The Ultimate Crème Caramel Recipe(I didn’t have molds that were all the same, so I used my collection of Japanese tea cups instead! – The two illustrated ones are from my childhood. And the one with the writing is a soba (buckwheat noodle) sauce dish that my parents brought over from Japan over 25 years ago!)

.

x x x x x x x x x x x x x x x x x x x x x x x x x x x x x x

.
Since my last post:

I’ve been naughty of late. My sweet tooth never stops craving, it’s just terrible. My nearby convenience store’s got a “buy two tubs for a fiver” deal for big tubs of Häagen-Dazs (Praline & Cookie’s n’ Cream’s my favourite – what’s yours?). And I’ve been tucking in to them with a big tablespoon (no dilly-dallying with a wee teaspoon I say!), late at night, wrapped up in my blanket, fireplace on, surfing the web endlessly with the other hand, quite meaninglessly whiling away my time, browsing from a web link to another link…

.

But, now that the cheap ice cream deal is over…, I decided I must start making my own desserts again that I can stick my sweet tooth in to!

.

x x x x x x x x x x x x x x x x x x x x x x x x x x x x x x

.

So, here is the ULTIMATE recipe for Crème Caramel that I have been indulging in lately.
.

I call it ‘Ultimate’ because, I can honestly say it really is the most creamiest, & yet most delicate Crème Caramel I’ve ever tasted in my life! Every luscious spoon sends blissful melt-down of your surroundings, & before you know it, it’s gone… – & you curse yourself for not making more… Yup, ladies & gents, it’s THAT good.
.

It is dead-easy to make too if you follow certain steps. Crème Caramel in basic terms is literally just a three-step method: mix, sieve & water bath, with the most simplest of ingredients (eggs, sugar, milk & cream optional). The most important trick to keep in mind is to try NOT TO incorporate AIR, as the final silky texture will suffer greatly.
.

In this special recipe, I did not use any egg-whites, as per normal Crème Caramel recipes. It relies on just egg-yolks to set the liquids. This is what makes this that extra rich & thick in flavour, yet delicate, as well as the softest you’ll ever ever taste. Despite no egg-whites, it keeps its shape very well, so long as you refrigerate it for a good 4 hours.
(Note: Although, if you’re using a very big mold, it maybe better to look for a recipe that uses whole eggs &/or gelatine that will help to hold its shape better.)

.

Please keep in mind the quantity of ingredients listed below makes roughly 6 to 8 individual Crème Caramels. It’s all dependent on the size of your chosen molds. The best way to know how many this quantity will make is to measure 700ml of water & fill the molds to see how many it fills.

.
x x x x x x x x x x x x x x x x x x x x x x x x x x x x x x

.

THE ULTIMATE CREME CARAMEL RECIPE

.
Ingredients
For Caramel:

40 cc Water
80g Sugar
20cc Water

For the Crème:

250cc Double cream
250cc Milk
4 x Egg yolks
60g Sugar (granulated or castor)
A few drops of Vanilla essence OR half a vanilla pod, split length way

.
Prepare this before you begin:

  • Make sure your eggs are at room temperature, as cold egg won’t mix well with the milk.
  • Butter inside the individual molds so that the Creme Caramel de-molds smoothly.
  • Pre-heat the oven to 160 degrees.

.
METHOD:
.
First make the caramel.

  • 1. First stir the sugar & 40cc of water to a syrup in a small thick bottomed pan. Then cook on medium heat so that the whole base of the pan is equally heated. During this time do not stir too much.
  • 2. Once it starts to colour, stir with a wooden spoon. The colour will start to darken – & once you reach ‘a step or two before’ your desired darkness, take it off the heat & SLOWLY pour & stir in the 20cc of water to stop it colouring any further.
  • 3. Immediately pour the caramel in to your molds before it becomes too thick to handle.
  • 4. Make sure the bottom is completely covered by tilting the mold around.

Caramel Tip:
– Never let the caramel darken too much, it’ll taste too bitter. The caramel suddenly turns
from sugar liquid to dark & bitter in a split second, so I advise you take it off the heat (in step 2) while it is slightly lighter still. It’ll darken ultra-quickly while you’re stirring more water in to it anyway.
– Never leave it cooking alone. It is dangerously hot.
– Never ever pour the water in to it in one go. It is highly dangerous as it will foam up like mad & increase in volume & splutter.

.

Next, make the Crème:

  • 5. Heat the milk & the double cream in a pan – (with half a vanilla pod if you’re using it instead of vanilla essence).

Tip: Here, never let it reach the boil. Or more precisely, never let it go over 60 degrees as the milk will form a skin on the surface. – At 60 degrees the protein coagulates when exposed to air. So skimming & throwing away this skin means you are throwing away the delicious proteins & fat molecules.

.

  • 6. While the milk mixture is heating, GENTLY whisk the egg yolks in a mixing bowl.
  • 7. Then mix in the sugar GENTLY.

Tip:
– Always mix the sugar into the eggs straight away. Don’t leave the sugar lying around with the egg as the sugar will absorb moisture from your egg & leave dry gravelly bits.
– Always stir the sugar in SLOWLY. Do it as if you’re cutting it up, rather than whisking it, as if you’re scraping the sugar against the bowl. Crème Caramel is a dish that purely uses the solidifying power of the egg as it heats, so the finer you ‘cut’ the egg yolk up, & incorporate it in to the mixture, the better the overall texture.
– DO NOT INCORPORATE AIR whilst mixing. This is the most vital trick to make your final Creme Caramel smooth.

.

  • 8. Pour & mix the hot milk/ cream liquid in to your egg bowl. Add vanilla essence if you are using it instead of vanilla pod.

Tip: Pour in a small amount first & mix, & then pour some more. Let the egg mixture get used to the hot liquid little by little. Never pour the hot liquid in to it in one go. You have to be cautious as eggs solidify at 60-70 degrees, although the sugar should act as a good blanket.

.

  • 9. Lay a few layers of kitchen paper or a cloth inside a roasting pan, & place your molds.
  • 10. Use a sieve & slowly pour the mixture in to the molds.
  • 11. Remove air bubbles by tapping mold lightly on your work-table, &/ or by spoon. Lightly dabbing the bubble with kitchen towel also works well.
  • 12. Lid each mold tightly with aluminium foil.

Tip:
– Laying some kitchen paper stops directly heating your Crème Caramel from the bottom.
– The temperature of the Crème mixture should still be warm (if it is cold, it’ll take longer to bake in the oven).
– Sieving the Crème mixture gets rid of air bubbles, aswell as the chalaza (the ropey strands of egg white).
– Lidding the molds with foil prevents the top surface from drying under direct oven heat.

.

  • 13. Boil lots of water in the kettle. And pop the roasting pan with the prepared molds in to the pre-heated oven. Keep the door ajar to pour the hot water in the pan, half to two-thirds up.

Tip: It’s best to pour the hot water in to your water-bath when the pan is already on the oven shelf. This way, it is less likely for the water to accidentally make way in to your molds while transfering from work-table to oven.

.

  • 14. Bake for 20 minutes at 160 degrees, & then 10 minutes at 170 degrees without the lid. After the baking time, remove from the oven. Check if baked thoroughly by gently shaking it sideways. If it wobbles too much & creases form in the middle, put it back in the oven for another 3 minutes & check again (crease form when the sides are cooked, but not the middle). ‘Bouncy’ & ‘springy’ wobble is cooked.
  • 15. Take it out of the water bath, & leave aside to cool. Once cool, refrigerate for a good 4 hours before serving so that it sets fully.
  • 16. To demold, run the edge of the knife around the rim. Place inverted plate on it. Hold both mold & plate firmly together, then flip it so that the mold is on top. Gently shake up & down. It should smoothly come out. Let the caramel sauce pool around the set Crème.
  • Bon Appétit!

.
Coco&Me - The Ultimate Crème Caramel Recipe - with photos of process
.
Suggestions on alternative flavours:
You can ‘flavour’ the milk at step 5 with ‘coffee’ & ‘tea’.
You can also use honey instead of sugar too.
Or why not add brandy or rum? Or what about green tea, or chocolate flavour?

.

October 27th, 2007

Crème patissière (pastry cream)

.

I’m pretty certain you’ve all come across Crème patissière before. Pronounced “Krehm pah-tee-see-ehr”, it is also known as pastry cream, & confectioners’ custard. It’s that flour-based custard cream that’s used to fill desserts such as eclairs, tarts, & mille-feuille.

.

It is the basic of crèmes, & is the most widely used cream type when it comes to pastry making as it is used as a base foundation to make other types of creams such as Crème diplomate, Crème mousseline, Crème chiboust & Crème frangipane.

.

I make between 650g to just over 1kg of Crème patissière every week to fill the inside layer of ‘Gateaux Basque with prunes’, & also to mix some with Crème d’amandes (almond cream) to end up with Crème frangipane, which, once baked in the tart case becomes the foundation for my fresh fruit tarts.

.

So here’s the recipe below. Sorry if the recipe reads long – I tried to explain why every step is done in that way, … because, knowing the ‘whys’ of how things work, is one step closer to getting a good result!
.

x x x x x x x x x x x x x x x x x x x x x x x x x x x

.

Crème patissière (pastry cream) recipe:
.

Ingredients (to make 650g):

500ml fresh milk (full fat)
1 x vanilla pod
6 egg yolks (free-range or organic)
150g sugar (castor or granulated)
50g plain flour (sifted)

.

… ice cubes
… cling-filmed tray/ vat (cling-film the bottom & the sides with one sheet). Keep it cool in the fridge until needed.

OR

… stainless steel mixing bowl
.

  • 1. In a large mixing bowl, whisk the egg yolk. (Refer to paragraph at the end about what to do with the left-over egg whites)
  • 2. Add the sugar in one go. Whisk straight-away & thoroughly until the sugar dissolves. The golden rule here is to never leave a mound of sugar lying around in the egg yolk. Sugar has the same tendency as salt, it absorbs moisture, so if you don’t whisk it together at first instance, it’ll suck moisture from the yolk. Bits of yolk would dry, & leave orange ‘granules’ in your crème.
  • 3. Sift the flour in, & fold it in until the flour just disappears. Never over-mix the flour, as it will produce gluten, which will give your crème a tough texture. (If you want to read more about flour & gluten, click here.) – – – – – – – – Here, flour also acts as a heat-shield to protect your eggs from cooking like omelette when you add the hot milk later on. – – – – – – – – Some Crème patissière recipes call for cornstarch instead of flour, or sometimes ask you to use both. It produces slight difference. Cornstarch gives you a ‘clearer’ crème, whilst flour results in a more ‘milky’ look. The texture is also slightly different too – cornstarch one is a little ‘jelly-like’ & ‘bouncy-er’. If you are using your Crème patissière as a base to create other crèmes, then it is best to stick to just flour.
  • 4. Flatten the vanilla pod with the side of your knife (so that it is easier to cut), & cut it in half, lengthways. De-seed. The use of vanilla in Crème patissière is important as it keeps the ‘eggy’ smell down. If you are using vanilla essence instead of pod, add the essence right at the end, after the Crème patissière has cooled down.
  • 5. Place the seeds & the pod-skin in the cold milk. … Boiling milk with the vanilla is the best way to enhance the vanilla flavour to its fullest.
  • 6. Heat the milk in a pan over the hob (the size of the pan must be big enough to be used to cook the crème at a later stage).
  • 7. Let it reach just before the boiling stage.
  • 8. Pour small amount of the hot milk (roughly 1/4) in to the egg mixture in the mixing bowl. Whisk & mix. Pour the rest in. Whisk & mix. … It is best to start off mixing with small amount of hot milk, because you’d have better control over the mixture & make sure you won’t be left with lumps.
  • 9. Sieve all of it back to the pan. … Sieving gets rid of the vanilla pod-skin.
  • 10. Put it over high-heat, & whisk ‘all the time’. … The key word here is high-heat. Cooking over weak heat takes too long, & it’ll produce gluten that would toughen your crème, as opposed to the smooth texture you are after. So, always whisk, energetically, to ensure that the crème doesn’t get burnt on the bottom & sides of the pot.
  • 11. After it reaches boiling point (bubbling on the surface), keep cooking for another 2 minutes. You want to cook the flour thoroughly.
  • 12. Pour the hot mixture in to the cold cling-filmed tray. And use the the ice & water method, called an ‘ice bath’, whereby you place your tray in a bigger tray that is filled with ice & water. … Ideally, it shouldn’t be over 1cm deep, so that it cools quickly. – – – – – Not only is this important so as to stop its cooking process, it is vital to cool it ’til below the ‘temperature danger zone’ (between 5 degrees and 60 degrees) where most bacteria grow most rapidly to dangerous levels, some doubling in number within twenty minutes. – – – – If you don’t have a tray & using a bowl instead, use stainless-steel. And use the ‘ice bath’ method with another larger bowl.
  • 13. Cling-film the top surface. The film should lie right on the surface. This is to stop the top surface from forming a skin.
  • 14. Once mostly cool, place the crème in the fridge until needed. Make sure your fridge is set below 5 degrees. If not sure, best to buy a fridge thermometer.
  • 15. Blend well with spatula before using.

.

x x x x x x x x x x x x x x x x x x x x x x x x x x x

.

Suggestions for left-over egg whites:

make meringues, macarons, add one whole egg to make fried egg (or indeed what about a yolk-less fried egg?), or you can freeze it until you need it! To freeze, spoon egg whites in each section of a ice cube tray & pop it in the freezer. Then remove the egg white cubes in a freezer zip-lock bag, label it with the date & store.