May 15th, 2008

Egg, dairy & nut free chocolate cake

(& about my Birthday trip to Lewes)

Vegan Chocolate Cake - Egg, dairy & nut free chocolate - with Recipe - Coco&Me

.

Hello there everyone! I’ve been away from posting on the blog for sometime haven’t I…? Sorry (tell me you missed me) ^^.

.

It’s because I haven’t had any exciting desserts to post about!

Since I gave birth, I’m feeling just plain flabby. I hate hate hate it (I can’t even face looking at the full-length mirror), & so I have been staying away from making & subsequently scoffing sugary desserts. Call me vain, sometimes vanity overrules appetite, even if it’s for my passion for cakes! Hope you understand…
.

Wednesday two weeks ago was my birthday (32!), & so in that following weekend, we decided to drive to Lewes (a small town in SE England) to stay over at our friends L & W’s place as a special birthday treat. Loyal blog-readers would know that I tried & miserably failed to reach Lewes last year, but hurray! this time we managed to get there no problem, & in just over 2 hours!
.

Our friends L & W has a beautiful daughter who has serious allergy to egg & nuts. If she were to accidentally eat any of these ingredients, it could be life threatening for her. It must be tough for the whole family when you ALWAYS have to check the ingredients list on the back of products, & to tell your toddler that some products are not for her to eat, when other kids can.

.

I made the mistake of boasting to the family about my son’s wonderful strawberry toothpaste, that it is the only one my son likes. Their daughter wanted to try, & we were about to let her, when our friend spotted that the toothpaste has horse chestnut listed in its ingredients… It was a total shock, & then horror moment for me – that a toothpaste had nuts as an ingredient, & that I could have made their little girl very ill.

.
It didn’t occur to me that a non-food product could also be dangerous for her. I was then told that even a small amount of nut-oil that happened to be hidden in the hand moisturizer that her mummy was using would swell up the little girl’s hands by contact.
.

So it is no surprise that her house is a ‘egg & nut free haven’. And that we were treated to foods under that rule.

.

Soon as we arrived, L made us beautiful lunch – & while we were eating it in their country-side garden, L had a chocolate cake baking in the oven. The delicious smell wafted & lingered in the air. Ahhh…, I love home-baking. Nothing like the excitement of straight-from-the-oven cake for dessert. But when L told me it’s Vegan, & that it uses vegetable oil & vinegar as replacements to butter & eggs, I felt a little wary & my excitement deflated. I felt deprived of “the real thing”. Butter & eggs gives cakes flavour, so replacing them didn’t sound at-all apetizing.

(The science: Mixture of vinegar & the bicarbonate of soda creates carbon dioxide gas & raises the cake as it tries to escape out. (you can inflate a balloon this way!) And as for the inclusion of vegetable oil: it is 100% fat in replacement of the fat from the butter that you would’ve used. Butter has atleast 80% milk fat.)

.

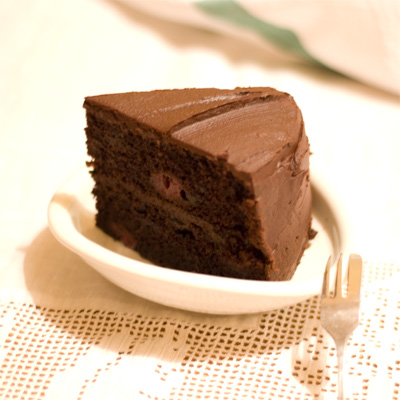
BUT to my surprise, it was totally TASTY! It was super moist & airy too. And you know what? I can even go as far as to say that I rate the “moist-ness” better than any other chocolate cake I’ve tasted in years (except for my very own ‘Moist Chocolate Cake’ from my stall ofcourse! ^^). And that is a big statement coming from a cake-fanatic like myself. I must say though, that it lacks in the depth of chocolate flavour, but eating it with the ganache filling sorts that problem out.
.

So here is the recipe that I scribbled from L’s copy of “Allergy-free Cookbook” by Alice Sherwood. (The recipe book gets a big thumbs up from L who says every recipe in it is really good.) I took the liberty of changing the measurements around a bit to make it slightly more chocolatey, & less oily. I replaced the castor sugar it suggests to light brown sugar for the molasses flavour. Oh, & converted the there-abouts ‘tablespoon & teaspoon’ measurements to proper & precise grams n’ milliletres!

.

The book gives you a choice of either spreading chocolate ganache cream or chocolate buttercream (both dairy-free). Both cream recipes are at the end of this post. The chocolate buttercream was a bit too sweet for me, but it was popular with children. The amount of sugar together with the sugary cake scares the heck out of me though… – I suggest if you’re going to serve this cake to grown-ups, go for the ganache.
.

Please bare in mind though that if you’re going for the ganache option, nut-free chocolate may be hard to obtain. Most Confectioners use nuts in many of their products, & they might be using the same production-line to make products without nuts in the ingredients. This is where the problem for people with nut-allergy lies. Pretty much all the chocolate bars on the market may have traces of nut, or nut-oil.

.

Thankfully there is a UK-based company Kinnerton who produces guaranteed nut-free chocolate products. It is apparently sold in selected Sainsbury, Asda, Tesco, Morrisons & Waitrose stores. Or you can buy in bulk directly from them too. Kinnerton has really gone the extra mile to manufacture nut-free products by allocating nut-free zones, as well as following strict safety measures to keep it nut-free. Read all about how they did it on their website.
.

There are a few moderations I’ve made to the recipe:

  • Vinegar is to be added as the very last ingredient. – It’s to delay it reacting with the soda. You should get the maximum rising-power out of it that way.
  • I’ve included cherries & jam. – Our friend L spread fruit jam in-between the layers & mixed cherries in to the cake, which I thought really made this extra special.
  • I propose using apple cider vinegar instead of white vinegar as the book suggests. – Apparently the concentration of acidity is stronger, & without any scientific background, I’m hoping it’ll react even more with the soda & produce a fluffier sponge. – It’ll add a tiny bit more flavour to the cake too. And did you know that cider vinegar is good for treating sore throat? – Hey! A cake that’s good for illness? Now we’re talking!!
  • And optionally, you can add a splash of Kirsch cherry liquor in to the ganache to add to the cherry theme!

.

Vegan Chocolate Cake - Egg, dairy & nut free chocolate - with Recipe - Coco&Me

x x x x x x x x x x x x x x x x x x x x x x x x x x x x x x x x x x x x

.

Egg, dairy & nut free chocolate cake Recipe:

(serves 10-12)

.

Ingredients for the sponge:

  • 330g of plain flour
  • 400g of light brown sugar
  • 12g of Bicarbonate of Soda
  • 65g of nut-free cocoa powder

    (Note: check the back ingredients list to make sure it is nut-free. Cocoa powder is often made in chocolate factories that also handle nut products.)

  • 2g of salt
  • 450ml of unsweetened soya milk
  • 90ml of corn or other nut-free vegetable oil, plus extra for greasing

    (Note: don’t use olive oil as its flavour is too distinct)

  • 23ml of white vinegar
  • 7ml of vanilla extract
  • A large tin/ jar of pitted cherries
  • Fruit jam of your choice (cherry, apricot, strawberry, raspberry, etc)

.

You’ll need:

  • 2 x 20cm (8 inch) round baking tins

.

Method for the cake sponge:

  • 1. Pre-heat oven to 180C (350F, gas mark 4).
  • 2. Grease both tins with oil. (No need to line it with grease-proof paper. The oil on the tin & the oil from the cake is sufficient enough lubricant for de-moulding the cakes.)
  • 3. Sift together the dry ingredients in to a bowl: flour, sugar, bicarbonate of soda, cocoa powder & salt. (The light brown sugar tends to clump, so please don’t skip sifting!)
  • 4. Mix together the wet ingredients in another bowl: soya milk, oil, & vanilla extract.
  • 5. Mix wet ingredients to the dry ingredients.
  • 6. Stir in the cider vinegar.
  • 7. Divide mixture in to two greased tins.
  • 8. Spread evenly.
  • 9. Evenly scatter the cherries on top of the batter. Here make sure you don’t place any cherries in the centre – this way you’d be able to cut a clean slice with a straight angle when serving.
  • 10. Bake for 40 minutes, until it rises, & is firm to the touch.
  • 11. Cool in the tin for 10 minutes, & then turn out on to a wire cooling rack ( – I like to cool it upside down, so that the domed top becomes flat surface perfect for icing). Cool completely.
  • 12. Make the dairy-free ganache or the chocolate buttercream using the recipe below.
  • 13. Place one sponge upside down on the stand/ platter on which you’re going to present on.
  • 14. Slather jam of your choice.
  • 15. Use spatula to spread 5mm thickness or so of the ganache/ buttercream.
  • 16. Pop the other sponge on top.
  • 17. Artfully (painterly) slather the rest of the ganache/ buttercream on the top & the sides.

.

x x x x x x x x x x x x x x x x x x x x x x x x x x x x x x x x x x x x

.

Ingredients & method for the dairy-free ganache:

  • 150ml soya cream (in place of double cream)
  • Nut-free & dairy-free dark chocolate 200g
  • 100g castor sugar
  • 7ml Kirsch cherry liquor
    Method:
    Bring soya cream & sugar to simmering point & pour over the finely chopped chocolate. Mix gently with spatula (If the chocolate has not fully melted, zap it in the microwave 10 seconds at a time until melted). – Use immediately.

.

Ingredients & method for the dairy-free chocolate buttercream:

  • 175g dairy-free spread
  • 400g icing sugar
  • 90g of nut-free cocoa powder
  • 10g of vanilla extract
    Method:
    Cream the dairy-free spread to thoroughly soft. Add vanilla extract & mix. Slowly & gradually add icing sugar & cocoa powder until creamy and smooth in texture. Use immediately.

.

x x x x x x x x x x x x x x x x x x x x x x x x x x x x x x x x x x x x

.

coffee mugs - lewes park - Coco&Me

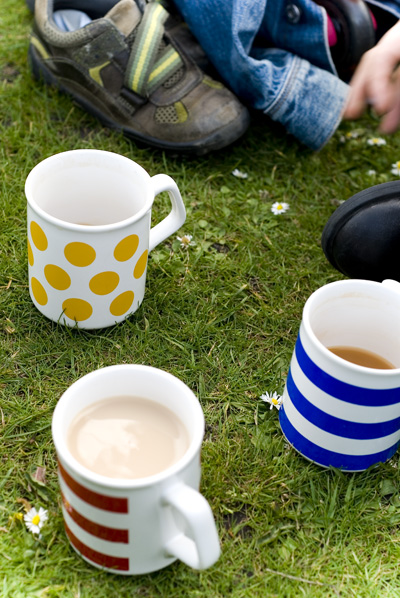
(In Lewes, we visited Southover Grange gardens. I was extremely happy to get a proper porcelain mug (& not the usual paper throw-aways with plastic lids) for my Rooibos tea from their kiosk! And how wonderful that everyone dutifully returns it to the kiosk when they finish! (if this was a park in London, more than half would probably disappear I’m sure…) – It reminds me of drinking Glühwein from a porcelain mug at a German Xmas market, but only you’d have to pay extra first, & you’d get a little money back if you return the mug!)

Lewes park - Coco&Me

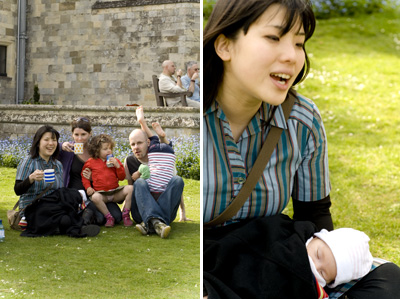
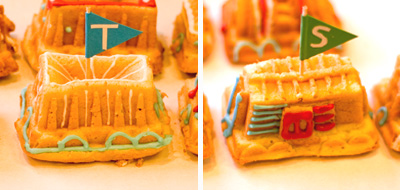
(From left: Me, L, cutie girl I, W, & my boy upside down. And in the right picture, my daughter S asleep.)
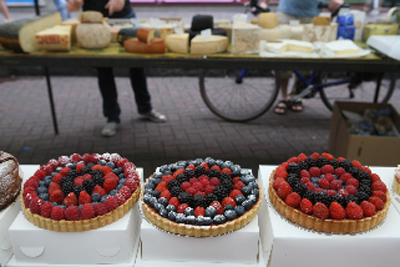
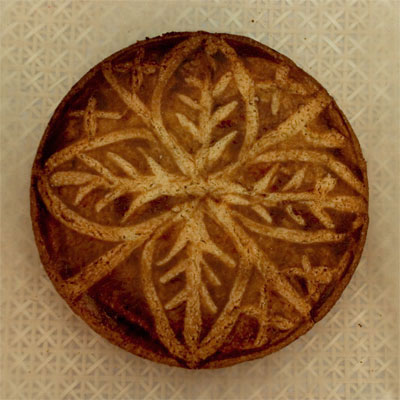
February 1st, 2008

Children’s birthday cake ~ banana cake trains!

I baked this set of trains for my kid’s best friend’s 4th birthday!

I kept the icing simple with just three colours & as minimal as I can allow it. I stayed away from using sugary gum drops & other store-bought sweets because: One, as a parent I wouldn’t want my 4 year old introduced to those things yet, & Two, icing them is so much cheaper! :)

Coco&Me - Children's Birthday Cake - in shape of Trains, with royal icing!

Handmade paper flags glued to cocktail sticks:

I decided it’s better if the flags were not white. It will be lost in the background, & the coloured flags would add the much needed extra colourfulness that my minimal-icing-ideology doesn’t provide. – But on the other hand, I made more work for myself & D (he helped), as I couldn’t just ‘stamp’ letters on to dark coloured paper (I don’t have white ink), & had to cut each letter out & glue them!

Each child received one train each. It was easily distributed since there was no cutting slices involved. The flags were popular (“I’ve got K!” & so on). Everyone took it home with them!

(At every children’s birthday party we go to, there’ll always be another kid who’d be blowing the candles too! :)
Coco&Me - Children's Birthday Cake - in shape of Trains, with royal icing!

(For the cake board base: I cut cardboard to size & covered it with white baking paper.)

Coco&Me - Children's Birthday Cake - Trains - with Banana Cake Recipe! - NORDICWARE

(Nordicware Train Cake Pan purchased from Lakeland)

.
Am I turning in to a right old woman or what?

Because when D spotted the Nordicware Train Cake Pan in the shop, I was soooo happy – like, deliriously, over the moon style! It’s really difficult to find Nordicware here in the UK, & this particular train cake pan had been on my wish-list for over a year. I once spent a whole night trawling the internet to see if anyone sells this in this country but to no avail…

BUT…! Out-of-the-blue, there it was in front of my eyes… SO, readers, hopefully you can understand my cake-fanaticism, & picture me enthusiastically charging my way to the cash-till in nano-second-flat, flared nostrils, seeing nothing but red until I successfully purchased it, until “It-Is-Mine!” (followed by manic laughter – Dr Evil style…)
.

x x x x x x x x x x x x x x x x x x x x x x x x x x x x x x x x x x x

.

This purchase came at the perfect timing too, as the following week I was to make a birthday cake for my son’s best friend. Like always, I test-baked several days before the real bake-day, to remove any uncertainties that could potentially ruin the result. The lessons learnt from the test-bake was valuable:

  • The cake batter must be piped (not dolloped in), so that the batter reaches all intricate detail of this cake pan.
  • Batter must be pasted/ pushed to all the sides with a spatula to avoid ugly air-holes appearing on the train surfaces.
  • Batter must be to the fullest brim to perfectly imprint the cake design.
  • Must use more colours than just white for the icing, unless it’s a snowy scene you’re trying to create.
  • It is best to pipe extra details like ‘grills’ & ‘windows’ or even abstract polka-dots, rather than faithfully outlining/ following the grooves of the cake.
  • Mustn’t pipe too much icing on it because the cake would become too sweet – & I can imagine the parents getting worried about too much sugar consumption! (especially if it’s artificially coloured!)

.

After consideration, I decided it should be a banana cake. A boring sponge won’t do (it’ll taste too normal unless there’s a delicious filling layer), nor it shouldn’t be chocolate coloured (the imprinted design wouldn’t be as visible). D suggested ‘marbled cake’ but that’ll just be ‘too busy’ with the intricate designs. – But a banana cake on the other-hand I thought, is gorgeously moist, popular with everyone & should get a nod of approval from the parents as it sounds natural & it uses less refined sugar.

.

So here is the recipe for my banana cake. It is a ‘Pâte à biscuit’ sponge method. (whereby the egg is separated – yolk goes in with the sugar, & the whites are whisked to a meringue, before being combined.)
I also added the recipe for the royal icing at the end.

Both recipes are easy-peasy to make!

.

x x x x x x x x x x x x x x x x x x x x x x x x x x x x x x x x x x x

.

MOIST BANANA CAKE RECIPE:

.

Ingredients:

(quantities to fill the Nordicware train pan)

200g Ripe bananas
100g Sugar
5 x Egg yolk
5 x Egg whites
100g Sugar (to whisk in to the whites)
150g Plain flour
75g Almond powder
75g Butter
.

Prepare in advance the following:

  • Butter the mould (here, it is best to use a pastry brush & slightly melted butter to really get to every intricate details & grooves). And finely flour the mould by sifting it.
  • Melt 75g of butter. Set aside until needed.
  • Pre-sift the plain flour & the almond powder.
  • Pre-heat oven to 180 degrees.

.

Method:

  • 1. Slice the 200g of ripe bananas, place them in a mixing bowl & use the electric whisk to purée it.
  • 2. Add the 100g of sugar & whisk it together.
  • 3. Combine the 5 x egg yolks. Then set aside.
  • 4. In another bowl, whisk the 5 x egg whites to a stiff meringue with 100g of sugar.
  • 5. Combine 1/4 of the meringue in to your egg-mixture from step 3.
  • 6. Sift all the dry ingredients (flour & almond powder) in. Combine with spatula.
  • 7. Pour in the 75g of melted butter & combine with spatula.
  • 8. Fold in the rest of the meringue.
  • 9. Put the batter in to a disposable piping bag.
  • 10. Snip the end so that you get a 3mm opening, & start to pipe it in to the intricate details.
  • 11. Then snip a wider opening (say about 1cm), & pipe the rest in.
  • 12. Place in the pre-heated oven of 180 degrees, for approximately 18 minutes. – When time is up, check if it is done by skewering the middle of the cake. If the skewer comes out clean & is warm to the touch, it is done.
  • 13. Take it out of the oven. Place a cake-cooling-rack on top. Grip both cake pan & rack, then reverse it so that the train-mould is on top. Take the cake pan off. The cakes should come out easily. (It is best to cool it right side up, to flatten the bottom of the cakes.)
  • 14. Once the cake has cooled, proceed to make the royal icing.

.

x x x x x x x x x x x x x x x x x x x x x x x x x x x x x x x x x x x

.
ROYAL ICING RECIPE:

.

Ingredients:

1 x egg white

125 to 150g of icing sugar

Food colouring

.

Method:

  • 1. Whisk the egg white with a table spoon (not with electric mixer as it’ll become ‘too’ foamy) for about 5 minutes.
  • 2. Mix 125g of icing sugar in to the whisked egg whites. This will give you the basic white icing. Experiment with the fluidity depending on wether you want to cover a large surface or wether you would like it to pipe patterns. If you want it to be thicker for piping patterns, gradually mix in more icing sugar. (In my case, I used 150g of sugar in the end, but it’s best to be your own judge here.)
  • 3. If you would like it coloured, add food colouring drop-at-a-time.
  • 4. Put the icing in a piping bag, snip the end off (say 2mm for pattern piping) & pipe away!

.

Tip:

If you want several colours to work with, just divide your white icing at step 2 in to however-many-bowls, & then colour each bowl differently.

If the royal icing becomes hard while you’re working, add a few droplets of water to loosen it.

If artificial food colouring worries you, try to find ‘natural’ food colouring in the shops, or you can alternatively try: matcha powder for green, & cocoa powder or instant coffee for brown. (If you know of any other ways to colour naturally, please please let me know!)

.

Happy Baking!

x x x x x x x x x x x x x x x x x x x x x x x x x x x x x x x x x x x

November 12th, 2007

Gâteau Basque with crème patissière

Coco&Me - Gâteau Basque(Picture taken at the stall table. – The patterned background?? I recently started to use woven wooden placemats bought from Ikea & baking paper on top to display my cakes, instead of cake cooling racks!)

Coco&Me - Gâteau Basque

(Gâteau Basque is a shallow cake with yummy custard cream centre (or sometimes cherry jam filling)! I put dried prunes in there too.)

Coco&Me - Gâteau Basque

.

Here’s another cake recipe from my stall table. It’s called Gâteau Basque, & yup, as you’ve guessed, its origins are from Basque Country, a cultural region in the western Pyrenees mountains that spans the border between France & Spain. .
.
Gâteau Basque dates from the 17th century, & its precise origins are found in the small spa town of Cambo-les-Bains, where they hold annual Gâteau Basque festival in September. Upon researching on this, I came across the existence of the Gâteau Basque Museum in the town of Sare (that is officially recognised as ‘most beautiful villages of France’) where I very much want to go to one day! (hint hint, D?)
.
There’s two ways of filling the middle layer:
One is to use the renowned black cherry jam (confiture de cerise noire), from the nearby town of Itxassou (where the cherry festival takes place in June). Or another, which is to thickly slab Crème patissière/ pastry cream (Click here to read my recipe!).
.
I fill mine with Crème patissière, & neatly lay dried prunes. Mainly because I love Crème patissière over jam, & I think the intensely condensed flavour of the dried prunes act as a welcome accent when munched with Crème patissière & the buttery biscuit-y cake.
.
Like I say, I make this for the market, & the reception I get is always very good. Most of the time, people don’t know of the cake, but on mention of custard cream middle, the British public (who grew up on custard at school & at homes) identify with the flavour involved, & make a nano-second decision to give it a try.

– There’s these two ladies who buy a slice of Gâteau Basque from me almost every week. If I didn’t have it at the table, because I was feeling slack (!) or wanting to concentrate the time on another product instead, they have been disappointed in the past. I often picture them in my mind when I’m rolling out the dough, wondering whether they be there that week.
.
Tips on making this cake:
It’s not a quick cake to make. The actual dough is a doddle, since it all happens in one mixing bowl, & there’s no sense of urgency as it’s not like there’s meringues deflating away because you’re working slow.

But it does need to rest for 2 hours minimum. (I make mine Thursday night, & roll it out on Friday.) You’d then need to make the crème pat, assemble, & finally into the oven for a whole hour! Not to forget the time it takes to cool the cake down before demolding it out of the tin!
.
x x x x x x x x x x x x x x x x x x x x x
.
Gâteau Basque recipe:
(to make a 10 inch cake. You’d be able to get 8 – 10 substantial slices out of it)
.
Ingredients for the dough:
200g butter
200g sugar
65g whole eggs
30g egg yolks
20ml rum
1g baking powder
335g plain flour (sifted)
approximately 100g of dried prunes
.
Ingredients for the Crème patissière (to make 325g):
250ml fresh milk (full fat)
vanilla pod
3 egg yolks (free-range or organic)
75g sugar (castor or granulated)
25g plain flour (sifted)
.
Ingredients for the Coffee Dorure (egg wash):
1 whole egg
1 egg yolk
half teaspoon of coffee granule
.
x x x x x x x x x x x x x x x x x x x x x
.
The method:

  • 1. Place the room temperature butter in a deep mixing bowl (so that it doesn’t spit everywhere when you’re whisking).
  • 2. Cream the butter using a whisk or an electric mixer, beat it till it is ‘creamy’ soft, smooth & light from incorporating the air.
  • 3. Mix in the sugar. Whisk until the sugar has dissolved in the mixture.
  • 4. Add the eggs & egg yolks in stages (so that the mixture doesn’t ‘seperate’).
  • 5. Pour the rum in & mix it all up.
  • 6. Sift in the baking powder & the plain flour.
  • 7. Use your spatula & mix it all in.
  • 8. When mixed, make one big ball of it & cling-film it air-tight.
  • 9. Refrigerate the dough for at-least two hours minimum, so that the dough has it’s ‘rest’ to let the gluten relax, it would become easier to roll it out later.

– – – – – – – – – – – – – – – – – – – – –

– – – – – – – – – – – – – – – – – – – – –

  • 11. Assembly time!! Get the dough out of the fridge, take roughly 2/3 of it & roll it in to a rough circular shape. You’re going to line the bottom & the sides with it. So make sure your circle is bigger than the tin base, plus not forgetting to include the width for the sides all around too.
  • 12. Butter & flour the mold.
  • 13. Lift the sheet of dough from step (11) using your rolling pin, & lower it in to the mold. Make sure you thumb it in to the corners.
  • 14. Neatly spatula in the Crème patissière layer inside. (Some pastry chefs would use piping bags for this procedure to be super neat!) Make sure the top is level.
  • 15. Flatten the prunes using the side of your knife & cut them in half.
  • 16. Neatly space them out on top of the Crème.
  • 17. Take the rest of the dough you have left over. You are now going to make the ‘lid’. Roll a circular disc that is just bigger than your mold. Using the rolling pin, lift the circular sheet of dough, & carefully lay it on top of the Crème.
  • 18. Using your thumb, push the edges of the ‘lid’ all around to seal it to the sides.
  • 19. Use knife & cut away the ‘overhang’, so that the top surface is flat.

– – – – – – – – – – – – – – – – – – – – –

  • 20. Make the coffee dorure (egg wash). Put all coffee dorure ingredients in a small bowl & mix until the coffee granules have melted, & has given lovely dark colour to the liquid.

– – – – – – – – – – – – – – – – – – – – –

  • 21. PRE-HEAT THE OVEN TO 180 DEGREES.

– – – – – – – – – – – – – – – – – – – – –

  • 22. Apply a thin layer of coffee dorure to the gâteau surface. Use a brush or your hand.
  • 23. Using the other end of the spoon (or any other instrument of your choice), draw any pattern you like.My tip here is to keep the design fairly simple. I like my pattern to be symmetrical, so that each slice you cut look pretty much the same.
  • 24. Poke a small hole in the middle as a air vent, to avoid the Gâteau Basque from forming cracks on the surface.
  • 25. Pop it in the oven for 1 hour. Do check how it is browning on top now & again. If you think it is browning too much, make a loose lid with aluminium foil to deflect direct heat to the top surface.
  • 26. When time is up, take off the foil if you were using one, & leave it aside in the mold until cool.
  • 27. De-mold by carefully inverting.
  • 28. Eat within the next 2 days. Bon Appétit!

.

x x x x x x x x x x x x x x x x x x x x x

(ps: I plan to photograph each step & put it up on this blog in the near future… promise!!!)

June 18th, 2007

Pâte sucrée (sweet pastry dough)

Coco&Me - picture from the stall

(The other week, a photographer called Gideon came by my stall to take some pictures for a picture library. What was really nice was that he has sent me the pictures, like he promised to! – So refreshing, coz I’ve had so many photographers promising to send me a print, but then never do so… – Here’s one that I especially liked!)

.

x … x … x … x … x … x … x … x … x … x … x … x … x … x … x … x …

.

This week, it’s about the tart dough I make every week.
.
Like all the recipes on my blog, it’s tried & tested – I can confidently say that it works & it’s the best. It’s actually tasty & flavourful, you can happily eat it on its own, – not like a bland tart casing that gets forked to the side of the plate with dissapointment.
.
(O.M.G, I’ve come across sooo many unappetizing tart cases in cafes & restaurants, you wonder why you’ve bothered paying your hard-earned money for such a boring tart!

.

And has anyone noticed that many of these establishments are now using ‘ready-made’ empty tartelette shells they buy in bulk from the catering wholesalers? When I was in Bond Street a couple of weeks ago, I had the time to wonder in to a reputable department store there, & as I do, I check their basement cafe, hoping for quality inspiration, & was bitterly dissapointed that the fruit tarts they had on display were using the ‘ready-made tart shells’! With a more than worthy price tag nevertheless! The cheek! £3.75 for a factory made, poorly made, puny fruit tart anyone?

.

It reminds me a bit of that chef off the telly who keeps using ready-made sponge flan bases from the supermarket in his desserts – honestly, why use inferior products with additives & god knows what else in it, & spoil the taste of the dessert you’ve been slaving on?? It really angers me when I see such products advocated. I think the guy is missing the point of “fine pastry making”…)

.

x … x … x … x … x … x … x … x … x … x … x … x … x … x … x … x …

.

Pâte Sucrée:

Pronounced “paht sou-kray”, the texture of pâte sucrée is crisp & crumbly like cookies such as shortbread. The taste is buttery rich, but not overly sweet like what the name suggests. It can be used to make sweet tarts & as a thin sheet under mousse. The left over can become delicious cookies that children would love cutting shapes from. Pâte sucrée is known as a ‘short’ dough, because of its high fat content to flour.

.

Please note, my recipe is a little different compared to the classic Pâte Sucrée recipes around, as it uses some almond powder in it. I think that’s what makes this pastry dough especially flavourful!

.

Pâte Sucrée Recipe:

(To make enough dough for a 8 inch/ 20cm tart)

Ingredients:

Unsalted butter at room temperature … 55 grams
Castor sugar … 32 grams
Eggs … 20 grams
Almond powder … 15 grams
Plain flour … 100 grams

.

  • 1. Place the room teperature butter in a deep mixing bowl (so that it doesn’t spit everywhere when you’re whisking).
  • 2. Cream the butter using a whisk or an electric mixer, beat it till it is ‘creamy’ soft, smooth & light from incorporating the air.
  • 3. Mix in the sugar.
  • 4. Add the eggs bit by bit & whisk it all in.
  • 5. Then mix in the almond powder.
  • 6. Next, in goes the flour. Using a spatula, mix it all in by pushing it against the bowl. Or do what I do, which is to wear food gloves & get in there with your hands. It’s so much quicker to do it like that when you have a large quantity like I do.
  • 7. Pat it in to one big mound, & clingfilm it tight.
  • 8. Refrigerate overnight.
  • 9. When time has come for you to roll it, first prepare a lightly floured clean surface (I use a lightly floured silpat).
  • 10. Get your chunk of chilled pastry dough in the middle.
  • 11. Lightly flour the rolling pin & roll firmly in one direction only, then turn it 90 degrees and roll again. Repeat until desired thickness. Never ‘stretch’ it by hand as this would cause the tart to shrink in the oven!
  • 12. Once the pastry circle is larger than the size of the tin, roll the sheet of pastry around your rolling pin & lift it up.
  • 13. Gently lower it on to your tin. Unroll.
  • 14. Using your fingertips, take the edge of the pastry & ease it in to the sides.
  • 15. Roll the rolling pin across the top to cut the excess pastry off.
  • 16. Put the tin in the refrigerator to rest for atleast 30 minutes before baking.

.

x … x … x … x … x … x … x … x … x … x … x … x … x … x … x … x …

.

Top Tips:

  • Do not over mix. It produces gluten & make the dough tougher.
  • Try to work quickly, minimizing the amount you’re handling it.
  • Work in a cool room. You don’t want the butter to melt in the dough.
  • I wear food gloves. Not only is it hygienic, my warm hands won’t be in contact with the dough.
  • Pick the surface with fork if you’re blind baking.
  • Be absolutely precise with the measurements. if not, you’d either end up with sticky wet dough, or a crumbly dry dough! I always use a digital scale.
  • If the dough becomes too soft while you are rolling, re-chill for a while until it’s manageable again. Adding more flour to it to make it firm is a definate no-no. It’ll unbalance the carefully considered measurements.
  • And remember, prepare in advance! You need to rest the dough in the fridge for a whole night to let the gluten relax. It’s to make the dough workable & to prevent shrinkage. And when you’ve rolled it on to a tart tin, you need to put the tins back in the fridge for 30 minutes atleast – again to prevent shrinkage.

.

x … x … x … x … x … x … x … x … x … x … x … x … x … x … x … x …

May 13th, 2007

Coco&Me Wedding Cake 01

cocome_weddingcake01.jpg

(Three tiered chocolate butter cake with raspberry ganache layer. Coated in pâte à glacer, & decorated with couverture slabs)

cocome_weddingcake02.jpg
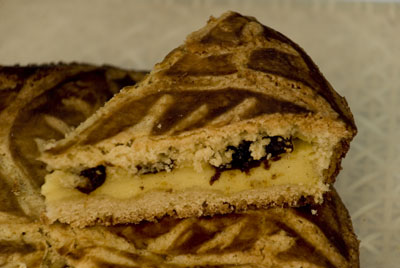
(I wish I could show you what the inside looks like… Obviously, I can’t cut in to it… Now I know I should’ve taken a picture of a slice when I did the test-bake…!)

.
Last Thursday I made a 3-tier wedding cake for Sue’s daughter Hannah. Sue has a stall close to mine, & she is one special lady, always looking out for me, buying cakes from my stall when times are tough on a rainy day, & always when she has guests that weekend. She would also bring me all sorts of “finds” that I might like (& I do!) from car boot sales & fairs. Cake plates, vintage cadbury’s toy car, chocolate moulds, vintage childrens books for my boy, beautiful vintage cake pillars… I really like her. Don’t get me wrong, it’s not because she gives me things! It’s because she is a warm person, & I think it’s important to have nice people like her around you, to remind you to mellow out & breathe a bit, because there’ll be someone there for you. And so I was honoured to be asked to make the wedding cake for her daughter. I’m happy that my first-ever wedding cake (which means so much to me) goes to such a good home!
.

Yesterday Sue & Hannah gave me the most wonderful gift. The cake stand that Hannah used for her wedding! I couldn’t believe it. The stand had been in their family for a very long time apparently, & it was Hannah’s strong wishes that it be used for her wedding cake. To give me such a special stand that means so much to them… I was honoured, & moved.

.

Do you remember I did a test-bake of it earlier this year? (check this link out to read a post from that time). Well, finally it was the time to do it – & the good thing is, I was not nervous about it atall, thanks to that test-bake. I knew exactly what to do, how long it’ll take, & importantly, how delicious it tastes. I tell ya, it’s just miles better than the traditional fruit cake kind (yuk, I never liked ’em) with overly thick icing that sticks to the back of the teeth.

.

Here is the recipe for the Coco&Me Wedding Cake. (although unfortunately, I do not have the ‘process pictures of it as I promised to do – Sorry guys, maybe next time – I just did not have the time nor the will to tinker with a camera on a big baking mission like this – especially when I had the pressure of meeting the deadline of 7pm handover!)
.

For bakers who would rather not have the trouble of tempering your own chocolate slabs, I think a good alternative is to use store-bought chocolate thins such as ‘Jules Destrooper Chocolate Thins’ or anything rectangular!

.

Some top tips when baking:

– Please read through the recipe thoroughy beforehand. That way there’ll be no surprises!
– If you do not have a 6 inch tin, do what I did – bake in a smallest that you do have (I had a 7 inch one) & cut a 6 inch cake out of it! Just remember to increase the recipe abit to compensate for it!
– And if you want to know about how to successfully whip egg whites, or how best to cream the butter, click this link for a thorough write up about it.
– Always buy some extra eggs! Just incase you brake one by mistake…
– Make sure your eggs are also at room temperature. Adding ‘straight out of the fridge’ cold yolk &/or cold meringue in to your cake mix would seize it up!

.

x x x x x x x x x x x x x x x x x x x x x x x x x x x x x x x x x x

.

Feeds: 25 to 30 people
Difficulty: Intermediate, if you substitute the chocolate slabs with something else such as store-bought chocolate thins.
Time to make: 3 to 5 hours (it depends on how competent you are at baking!)

.

x x x x x x x x x x x x x x x x x x x x x x x x x x x x x x x x x x

.

CHOCOLATE SLAB RECIPE:
Before you bake the sponges, make enough chocolate rectangles, clingfilm them & store in the refrigiator. I used over 60 slabs for the decoration. But I made alot more to make sure I had enough to hand ‘just incase’. The measurement was 3cm x 8.5cm.

.

To make the slabs:

1. Temper 1kg white couverture.
2. Pour it on to a big sheet of clingfilm that’s crease-free, layed out on your table. Spatula the chocolate surface to 3 or 4mm thickness.
3. When semi-set, use a sharp knife & a clean ruler to cut to size.

.

x x x x x x x x x x x x x x x x x x x x x x x x x x x x x x x x x x
.

THE CHOCOLATE SPONGE RECIPE:

.

Ingredients:

450g unsalted Butter – room temperature
450g dark Chocolate – melted
160g castor sugar (for step 3 in the recipe)
23 egg yolks
225g almond powder
egg whites 23 eggs worth
300g castor sugar for mixing with the egg whites to make meringue

450g plain flour
.

You will need the following items:

6inch (15.2cm) round springform baking tin
8inch (20.3cm) round springform baking tin
10inch (25.4cm) round springform baking tin
Cake cards for the three sizes – It has to be thin, not drums.
18 x thin wooden BBQ skewers cut precisely to 8.5cm high
2 x extra large mixing bowl
3 x cake racks
A long piece of clean string for tying around each tier to support the slabs while it sets

.

And prepare these before your baking frenzy:

Pre-sift the flour.
Have the chocolates melted in a seperate bowl.
Preheat oven to 180 degrees.

Butter the baking tins. Sift flour in to it so that it sticks to the bottom & the sides. Tap out excess flour, & store the prepared tins in the refrigiator until needed.
.

Method:

1. In a large mixing bowl, cream the room temperature butter.
2. Pour in the melted chocolate. Constantly whisk while doing so.
3. Whisk in the sugar.
4. Whisk in the egg yolks.
5. Whisk in the almond powder.
6. In a seperate bowl, make stiff meringue (To read up on how to obtain a perfectly whisked up meringue, click here).
7. Fold half of the meringue in to the cake mixture from step 5.
8. Sift in all of the flour & fold.
9. Next fold in the rest of the meringue.
10. Divide the cake batter in to the three cake tins.
11. In to the 180 degree oven it goes. (Pre-heated ofcourse!)
12. The ‘bake time’ for each size tin will be different. Because of this, you’ll be taking the tins out at different times. Please use the following as a guide, but please also do a ‘skewer test’ (inserting a skewer in the centre to see if it comes out clean).

6 inch = take out after 30 minutes

8 inch = take out after 50 minutes

10 inch = take out after 1 hour

13. When baked, take the tin sides off & cool them completely.

.

x x x x x x x x x x x x x x x x x x x x x x x x x x x x x x x x x x

.

RASPBERRY GANACHE FILLING RECIPE:

.

80g unsalted butter (room temperature)
1000g dark chocolate (preferably 70% cocoa solid, in button form for quick melt, or finely chopped from a bar – although bear in mind that chopping it up takes more time to do than you think)
800g fresh double cream
200g raspberry jam

.

1. Boil the cream in a pot.

2. Pour hot cream over the chocolate & the jam in a mixing bowl.

3. Leave to stand for 10 seconds. Then use your spatula to mix it in slowly from the centre, incorporating more cream from the sides as you do it.

4. Mix in the butter. Mix until it dissolves (if you still have lumps left, give it a 5 second wiz in the microwave).

.

x x x x x x x x x x x x x x x x x x x x x x x x x x x x x x x x x x

.

Pâte à Glacer (coating chocolate) Recipe:

.

2kg White couverture chocolate
160g pure vegetable oil

.

1. Melt chocolate in a mixing bowl.

2. Add oil. Mix together.
3. Place the mixing bowl in a ice filled water bath & keep stiring the chocolate/ oil mix with your spatula. Make sure you stir from the bottom of the bowl, where it is most cold. Keep stiring til it thickens.
4. Place the bowl in a hot-water bath for a very few seconds to bring the temperature up again.

5. Now it is tempered for coating the sponge.
.

x x x x x x x x x x x x x x x x x x x x x x x x x x x x x x x x x x
.

CAKE ASSEMBLY:

.

1. Cut cake in to two horizontally, & sandwich 5mm layer of the raspberry ganache.

2. Put the sandwiched sponge on a cut-to-size cake card.
3. Place the first sponge to be coated on a cooling rack, on top of a clingfilmed tray.

4. Pour some pâte à glacer over the cake. Smooth it down the sides, to cover it completely.

5. Sit down. Get comfortable. Take your time sticking one slab at a time to the side of the cake. Make sure to overlap each one slightly. Once you’ve stuck it all on, tie a string around it to support them. Now is your chance to really make sure each slab is straight. When you’re happy, pour more pâte à glacer in the centre of the sponge & let it fall down to all the sides. This would help fill any gaps inbetween the sponge & the slabs.

6. Repeat these steps for the other two tiers. Note, you can re-use the pâte à glacer that had fallen to the tray again to cover the next sponge.

7. Once you’ve done all three, next skewer some wooden sticks in to the bottom two layers. These would act as plinths to hold the weight of the next tier up. More skewers mean more stability, but also means lots of holes on your slice. Placing nearer the outskirt also gives you stability, but make sure it is not visible when assembled. Place one in the middle, & then symmetrically skewer in a circle.
8. Finally tower up your tiers & et voila! Phew… sit back, you can relax now, & enjoy the monumental view, possibly with a beer because you deserve it!
.
x x x x x x x x x x x x x x x x x x x x x x x x x x x x x x x x x x

« Previous Entries   Next Entries »