

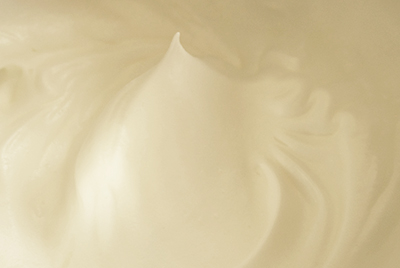
How to whip egg whites & obtain high volume with stability
.
Getting the most out of your ingredients is, I think, one of the most delightful things to do as a baker or a cook. It brings out the best results (in our case, a fine & moist sponge that has high volume!) & because you know how to best approach the ingredients, you can progress with the baking in a relaxed, untroubled manner.
– I also think we can get a lot more out of the ingredients when we treat it with respect & use it to its full potential. By proceeding with respect & gratitude to our foodstuff for being available to us, the sense of pleasure from cooking with it & then eating it is tenfold.
.
In terms of baking, whipping the egg whites is an essential technique.
.
There are actually 3 distinct methods to whip ~Â French, Swiss, & Italian way. Each are suited for different desserts. For example, the French meringue method is often used for sponge baking. The Swiss & the Italian method on the other hand are often used in cold mousses & cremes because the heat-process kills off bacteria, & makes it safer to incorporate.
.
The French meringue technique is by far the most widely used in home baking, so for this post I would like to focus on that & tell you everything I know to make foam that is fine & stable.
.
Fine foam = results in fine structured sponge (as opposed to course textured) that has a tender mouthfeel.
Stable foam = will not deflate so readily. Particularly vital for retaining the volume of the foam when folding in to the batter. It will also give you a bigger & fluffier sponge.
.
So, below, I have written the ‘how-to’ in steps (in bold letters) with the reasoning behind each (in regular letters). It gets a bit too science-y, but hopefully I have managed to get it across well enough! Happy reading~! xx
.
x . . x . . x . . x . . x . . x . . x . . x . . x . . x . . x . . x . . x . . x . . x
.
Coco&Me’s How Best To Whip Egg Whites
.
1.Â
Start with eggs straight from the fridge.
.
I know some say use room temperature, & some say no, use refrigerated. ~ So here is the logic to both:
.
The room temperature egg white is indeed easier to whip. It will trap the air easier because the surface tension is weaker. (= surface tension is the elastic tendency of liquids which makes them acquire the least surface area possible). But the downside is that the foam is less stable/ easier to deflate because it is not as viscous/ thick.
.
Whereas, for the cold whites, although it takes longer to whip (because it is thicker), the foam will come out stable. You will be able to create a much finer foam too, as, when you whip the stable foam, you are successfully splitting it to smaller multiples without it deflating.
.
= Using cold refrigerated egg whites wins the competition.
.
Some patissiers even go as far as putting the egg whites in the freezer until it is 1~4 degrees centigrade so that they have the added effect of having a head-start.
.
2.Â
Separate the egg whites in to a dry clean bowl that is not plastic. - Make sure you don’t have any broken yolk residue.Â
.
The reason for both has to do with lipids (another word for ‘fats’.) The fats contained in the yolk & any trace amount of oil on the surface of your mixing bowl has the negative effect on the foaming properties.Â
.
To explain why, I first need to tell you about what happens when you whisk:
.
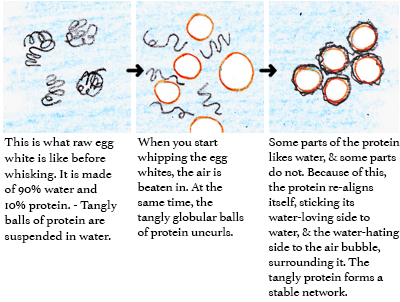
When you whisk the egg whites ~ which is made of about 90% water &10% protein ~ the tangly globular balls of protein uncurls. This is a process called denaturation, & as it uncurls, it exposes it’s long strands of amino acids. These amino acids has two distinct ends; the water-loving ‘hydrophilic’ & the water-repelling ‘hydrophobic’.
.
As the 10% protein uncurls in the 90% water, it aligns itself inbetween the water & the air, because of the hydrophilic/ hydrophobic nature. – Meaning, it immerses the hydrophilic end to the water, & sticks the hydrophobic end to the air.
.
Upon whisking air in to the egg whites, all the while, the uncurled strands get busy to attach to it & consequently traps the whisked in air within its new tangle. This tangle is now a network which crosslinks & holds its shape, stabilising the foam.
.
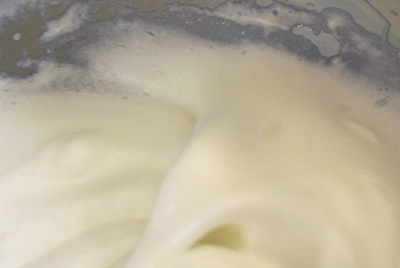
It’s a little difficult to grasp in words, so have a look at my diagram below:
.
Getting back to why lipids (such as fats from yolk & the grease from the bowl) inhibits the foaming properties is because it interferes with the protein that want to make a stable network. Namely, the air bubble & the lipids are in competition for the water-repelling hydrophobic protein. Â
.
As for why plastic bowls are not a good idea to use is because plastic is a porous material, & sometimes it can have residues of fats from the last use, even if you think you have washed it well.
.
3.
Firstly, on the lowest speed, loosen it up.Â
The egg whites has two parts ~ the thick viscous portion that used to surround the yolk & then the other part which is watery. It is best to first whisk those two parts together to blend it. This is because the watery part gets foamy quicker as it has less surface tension (same explanation as in step 1). When the two parts are blended, they foam at equal speed.
.
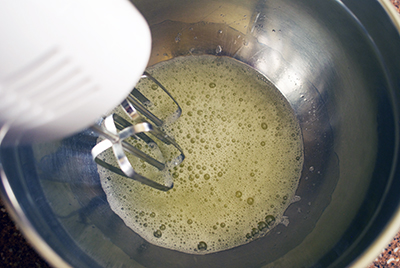

(First on lowest speed!)
.
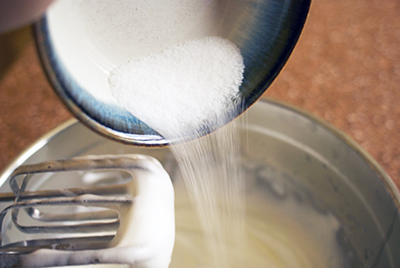
4.
When most of the liquid has turned fluffy white, & the foam starts to cling to your whisk, put in the first 1/3 of the sugar. Then turn the speed to high.Â
.
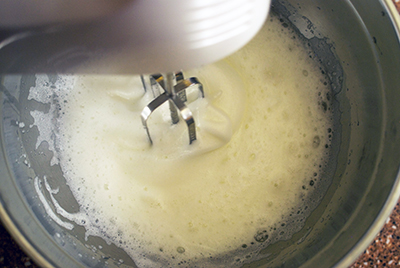
(Ready for the first sugar to be poured in!)
.
The timing at which you add sugar is very important. If too early, the foam will not stabilise & will be syrupy. And if too late, the water within will leak. To figure the timing for sugar, it’s best to understand the role of sugar in egg whites.
.
Sugar is hygroscopic (= it attracts & holds water molecules from the surrounding environment).
.
When you add sugar, the water content of the egg whites is withheld. The water becomes viscous/ thick & elastic. This thickened water has a stabling effect on the protein structure & holds the air bubbles in place.
.
This viscous water greatly helps when the cake is in the oven, as, the water is so thick, it is difficult for it to readily escape as vapour. As a result, it holds the air bubbles in place while the cake structure is stiffening its shape around it.
.
Which is all great news, but on the other hand, it is important to know that sugar has a negative effect on the foaming properties & results in reduced volume. If the water is too viscous, it is difficult to form the bubbles inside.
.
This is why sugar has to be introduced in stages, with the right timing. The egg white has to be foamed enough to accept the inclusion.
.
5.
The timing for the next sugar is when the volume has massed, & the foam is starting to get evenly fine. Put in half of the rest of sugar. The speed of the hand mixer should remain on high.
At this point, think about how your whisk is mixing it. The ideal way is for the whisk to incorporate as much air, right? So, if the whole whisk-head is submerged completely in the whites, it’s not catching in any air.
– Also, rotate your bowl so that you are whisking from every angle, & from every nook so that it foams uniformly.
.
(The foam’s evenly fine! Next sugar please~! Whizzing on high.)
.
6.
When you feel the foam is getting heavier & you can see stroke patterns, put in the rest of the sugar. – Nearer the end, when you think it has reached maximum volume, lower the hand mixer speed to low.
.
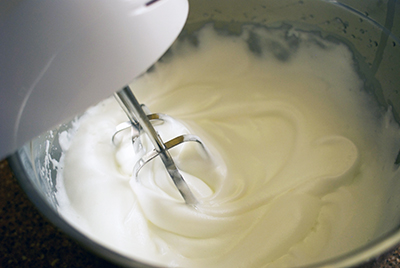
(Soon as you can make strokes in the whites, put the last lot of sugar in.)
.
(Done? Wait… there’s one last step…)
.
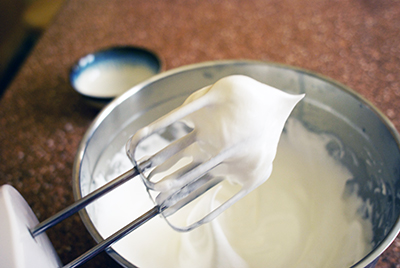
7.Â
As a last step, whiz your mixer around the outskirt edges & tighten the foam to make sure that the foam is of equal fine-ness all over.Â
In culinary terms this is called ‘serrer’. Foam on the outskirts tend to be less whisked. Because of that it tends to have a larger air bubble. In baking, it is best to have uniformly sized foam, as the larger air bubble will absorb the nearest smaller ones & become bigger (=’Coalescence’), giving you an unevenly textured sponge.Â
.
(Don’t forget the edges~! Above picture is an example of how the edges have bigger bubbles, so make sure you whisk these big bubbles too!)
.
x . . x . . x . . x . . x . . x . . x . . x . . x . . x . . x . . x . . x . . x . . x
.
Note A:
The ratio of whites to sugar:
When the amount of sugar is more than half of the whites, it is recommended to add sugar in 5 stages, not 3. This is because you’ll want to give each sugar inclusion a chance to melt before the next. – On the other hand, if the amount of sugar is less than 1/3 of the whites, the foam will be unstable & would not keep shape so well. The bubble will collapse too soon as it bakes & the sponge will come out too dense. I often hear of ladies with health conscience cutting back on sugar in the recipe, but I don’t recommend messing with it. But then again, so long as they don’t blame the recipe itself, it’s their cup-of-tea in the end I suppose…, right?
.
Note B:
About adding a pinch of Cream of Tartar & lemon juice or vinegar:
It’s all about the science-y pH balance…
.
The pH is measured between 0 to 14. 0 being ultimate acidic, 14 being ultimate alkaline. Lucky number pH 7 sits in the middle at neutral.
.
Our egg whites in question is sitting around pH 8 to 10 (Actually, more precisely speaking, fresh egg is pH 8, & older egg is at pH 10 as the acidity escapes from the pores of the egg shell during storage). Meaning, it is slightly on the alkaline side of the scale.
.
Lemon juice & vinegar is very acidic. They sit on a pH 2. Cream of tartar is at pH 4. Each number on the scale is 10 times more either way each time, so you can just imagine how super acidic these are.
.
In terms of whipping egg whites for baking, the protein strands (as explained in Step 1) react better when it is near pH 4 to 6. From this you can understand that when you add lemon juice/ vinegar/ cream of tartar,  you are readjusting the pH so that your egg proteins have a better chance. Note of warning though – too much added will have an inhibiting effect on foaming.
.
When I bake, I personally don’t bother with lemon juice/ vinegar/ cream of tartar. I like preciseness, so when a recipe calls for a ‘pinch’, it is too vague for me. But, if you are to use any of these ingredients, I would suggest that cream of tartar is probably the best option of the lot, as it is the least acidic at pH 4.
.
Note C:
Should sugar be added in the middle or the side of the bowl?
Quite some years ago, I came across somebody’s food blog, boasting about how adding from the side of the bowl was her idea, & how the method caught on. “…as dumping sugar in the centre would deflate the foamy whites.†Firstly I should point out, that that is wrong. Please pour in the sugar in a slow steady stream in the centre. If whipped correctly at each stage, the weight of a bit of sugar will not deflate any foam. The major problem when adding from the side of bowl is, it is a lot more difficult to get your whisk to, & because of that, you might have granular bits that hasn’t been incorporated sitting on the side, which would make your whites syrupy.
.
x . . x . . x . . x . . x . . x . . x . . x . . x . . x . . x . . x . . x . . x . . x
.
Lastly, my personal take:
.
Here is what I believe makes a baker create the best foam. And that is… ‘Imagination’. ‘Observation’. ‘Taking pleasure’. ‘Repetition’.Â
.
In this particular case with whipping the finest foam, imagine how the actual air can be best incorporated.
.
For example:
After reading my guide above, you now know that sugar makes the foam stable, but at the same time, if too much too soon, it inhibits it, right? So observe the foam you’re whipping, & imagine the bubbles forming. Do you think your protein network is tangling well? Imagine the new air bubbles created – popPOPpop! Oh you need more sugar? OKAY! Let’s pour more sugar in! Let’s trap the next batch of air!
.
When the whisking is done, feel the pleasure in how the bowl has gotten heavy with so much air inside. You’d be really amazed with the difference in weight. Take pleasure in the confirming moment that ‘air’ is actually ‘heavy’. Smile at how well you’ve managed this task!
.
Every week, I whisk about 25 egg whites in one go for the 6 flourless chocolate cakes for my cake stall. I make this in a huge huge bowl. When I succeed with whisking the best foam, I notice that my cakes are taller, & it looks good. I also get a bigger yield from it which could mean a sale or no sale for me! ^^
.
Ofcourse, like anybody, my skills were not good in the beginning, but over the years, I’ve gotten better. Good enough to now be able to write this ‘how to’ article. With baking, practising, practising, practising is the only way to success. Like learning a piano perhaps or riding a bike, you’ve got to practise it repetitively to get better. You can’t expect it to be amazingly perfect the first time round. No one is a superman or a superwoman!
.
x . . x . . x . . x . . x . . x . . x . . x . . x . . x . . x . . x . . x . . x . . x


