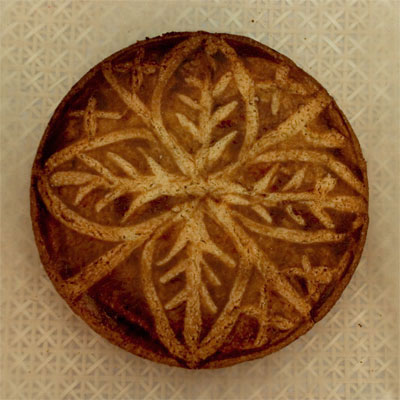
 (Picture taken at the stall table. РThe patterned background?? I recently started to use woven wooden placemats bought from Ikea & baking paper on top to display my cakes, instead of cake cooling racks!)
(Picture taken at the stall table. – The patterned background?? I recently started to use woven wooden placemats bought from Ikea & baking paper on top to display my cakes, instead of cake cooling racks!)

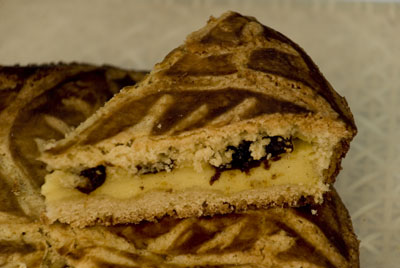
(Gâteau Basque is a shallow cake with yummy custard cream centre (or sometimes cherry jam filling)! I put dried prunes in there too.)
.
Here’s another cake recipe from my stall table. It’s called Gâteau Basque, & yup, as you’ve guessed, its origins are from Basque Country, a cultural region in the western Pyrenees mountains that spans the border between France & Spain. .
.
Gâteau Basque dates from the 17th century, & its precise origins are found in the small spa town of Cambo-les-Bains, where they hold annual Gâteau Basque festival in September. Upon researching on this, I came across the existence of the Gâteau Basque Museum in the town of Sare (that is officially recognised as ‘most beautiful villages of France’) where I very much want to go to one day! (hint hint, D?)
.
There’s two ways of filling the middle layer:
One is to use the renowned black cherry jam (confiture de cerise noire), from the nearby town of Itxassou (where the cherry festival takes place in June). Or another, which is to thickly slab Crème patissière/ pastry cream (Click here to read my recipe!).
.
I fill mine with Crème patissière, & neatly lay dried prunes. Mainly because I love Crème patissière over jam, & I think the intensely condensed flavour of the dried prunes act as a welcome accent when munched with Crème patissière & the buttery biscuit-y cake.
.
Like I say, I make this for the market, & the reception I get is always very good. Most of the time, people don’t know of the cake, but on mention of custard cream middle, the British public (who grew up on custard at school & at homes) identify with the flavour involved, & make a nano-second decision to give it a try.
– There’s these two ladies who buy a slice of Gâteau Basque from me almost every week. If I didn’t have it at the table, because I was feeling slack (!) or wanting to concentrate the time on another product instead, they have been disappointed in the past. I often picture them in my mind when I’m rolling out the dough, wondering whether they be there that week.
.
Tips on making this cake:
It’s not a quick cake to make. The actual dough is a doddle, since it all happens in one mixing bowl, & there’s no sense of urgency as it’s not like there’s meringues deflating away because you’re working slow.
But it does need to rest for 2 hours minimum. (I make mine Thursday night, & roll it out on Friday.) You’d then need to make the crème pat, assemble, & finally into the oven for a whole hour! Not to forget the time it takes to cool the cake down before demolding it out of the tin!
.
x x x x x x x x x x x x x x x x x x x x x
.
Gâteau Basque recipe:
(to make a 10 inch cake. You’d be able to get 8 – 10 substantial slices out of it)
.
Ingredients for the dough:
200g butter
200g sugar
65g whole eggs
30g egg yolks
20ml rum
1g baking powder
335g plain flour (sifted)
approximately 100g of dried prunes
.
Ingredients for the Crème patissière (to make 325g):
250ml fresh milk (full fat)
vanilla pod
3 egg yolks (free-range or organic)
75g sugar (castor or granulated)
25g plain flour (sifted)
.
Ingredients for the Coffee Dorure (egg wash):
1 whole egg
1 egg yolk
half teaspoon of coffee granule
.
x x x x x x x x x x x x x x x x x x x x x
.
The method:
- 1. Place the room temperature butter in a deep mixing bowl (so that it doesn’t spit everywhere when you’re whisking).
- 2. Cream the butter using a whisk or an electric mixer, beat it till it is ‘creamy’ soft, smooth & light from incorporating the air.
- 3. Mix in the sugar. Whisk until the sugar has dissolved in the mixture.
- 4. Add the eggs & egg yolks in stages (so that the mixture doesn’t ‘seperate’).
- 5. Pour the rum in & mix it all up.
- 6. Sift in the baking powder & the plain flour.
- 7. Use your spatula & mix it all in.
- 8. When mixed, make one big ball of it & cling-film it air-tight.
- 9. Refrigerate the dough for at-least two hours minimum, so that the dough has it’s ‘rest’ to let the gluten relax, it would become easier to roll it out later.
– – – – – – – – – – – – – – – – – – – – –
– – – – – – – – – – – – – – – – – – – – –
- 11. Assembly time!! Get the dough out of the fridge, take roughly 2/3 of it & roll it in to a rough circular shape. You’re going to line the bottom & the sides with it. So make sure your circle is bigger than the tin base, plus not forgetting to include the width for the sides all around too.
- 12. Butter & flour the mold.
- 13. Lift the sheet of dough from step (11) using your rolling pin, & lower it in to the mold. Make sure you thumb it in to the corners.
- 14. Neatly spatula in the Crème patissière layer inside. (Some pastry chefs would use piping bags for this procedure to be super neat!) Make sure the top is level.
- 15. Flatten the prunes using the side of your knife & cut them in half.
- 16. Neatly space them out on top of the Crème.
- 17. Take the rest of the dough you have left over. You are now going to make the ‘lid’. Roll a circular disc that is just bigger than your mold. Using the rolling pin, lift the circular sheet of dough, & carefully lay it on top of the Crème.
- 18. Using your thumb, push the edges of the ‘lid’ all around to seal it to the sides.
- 19. Use knife & cut away the ‘overhang’, so that the top surface is flat.
– – – – – – – – – – – – – – – – – – – – –
- 20. Make the coffee dorure (egg wash). Put all coffee dorure ingredients in a small bowl & mix until the coffee granules have melted, & has given lovely dark colour to the liquid.
– – – – – – – – – – – – – – – – – – – – –
- 21. PRE-HEAT THE OVEN TO 180 DEGREES.
– – – – – – – – – – – – – – – – – – – – –
- 22. Apply a thin layer of coffee dorure to the gâteau surface. Use a brush or your hand.
- 23. Using the other end of the spoon (or any other instrument of your choice), draw any pattern you like.My tip here is to keep the design fairly simple. I like my pattern to be symmetrical, so that each slice you cut look pretty much the same.
- 24. Poke a small hole in the middle as a air vent, to avoid the Gâteau Basque from forming cracks on the surface.
- 25. Pop it in the oven for 1 hour. Do check how it is browning on top now & again. If you think it is browning too much, make a loose lid with aluminium foil to deflect direct heat to the top surface.
- 26. When time is up, take off the foil if you were using one, & leave it aside in the mold until cool.
- 27. De-mold by carefully inverting.
- 28. Eat within the next 2 days. Bon Appétit!
.
x x x x x x x x x x x x x x x x x x x x x
(ps: I plan to photograph each step & put it up on this blog in the near future… promise!!!)


