October 29th, 2006

About chocolates (with ganache truffles recipe)
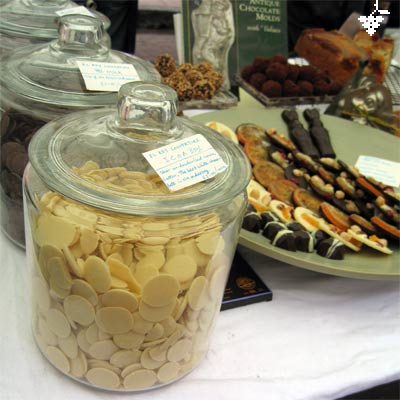
chocolate jars

First, a quick report on last Saturday’s trade:
Broadway Market being outdoor, weather plays an inevitable part in the sales & general foot count. Rain is my enemy & whenever I checked the weather forecast during the week, it had the ‘double raindrop with dark clouds’ symbol for Saturday. So not expecting great number of customers to show up, I made considerably less…

On Saturday morning, it was raining & was piercingly cold when I was loading the car. It was to be expected but the thought of bad prospects of sales gave me a mild depression anyhow… But by the time we were in the market unloading, the rain had stopped & soon as my table was set up, three large fruit tarts got sold to one couple organising a big celebration. That’s my stall rent sorted easy! And no more large fruit tarts to flog. That set my happy mode for the day, & I managed to sell all my stuff except for five truffles which I gave away to my stall neighbour.

– In the end, it didn’t rain again until four o’clock! Damn you, weather forecast…! I could have made more & sold more…

Anyway, for this entry I ought to start writing about my favourite subject; my absolute devotion to chocolate, that is to fine & honest chocolate, not to the usual suspects lining up the shelves in corner shops.


Chocolate is my first love before pastry, & the initial intentions of the Coco&Me stall was to sell just chocolates.

The stall name itself is a play with the word ‘cocoa’, & was the idea that came out with my good friend Ari. It makes me smile when I look back at the list of candidate names we came up with at the time; there was choko, choco, choco&co, cocoa&jo… Coco&co was the major candidate, but the name was already taken by a business some where obscure in England. Hence, a slight variation of it ‘Coco&Me’ was born. We thought ‘Me’ sounded more personal & friendlier anyway.
Now I’m just glad the name is something that doesn’t especially tie me down to solely selling chocolate, because as for the Summer I am a 100% cakes stall (I can not sell chocolates in the Summer because they melt from 19 degrees temperature, & it is virtually impossible to try to temper it in a hot kitchen!).

In very very basic terms there are two types of chocolates in this world:

  • Cheapo chocolates using vegetable fat (a substitute to cocoa butter to reduce costs) & poor percentage of cocoa solid content. It uses artificial flavourings & preservatives to make up for poor quality starting ingredients. It might use a chemical substitute called Vanillin instead of Vanilla, which has a cheap ‘candy’ like metallic after taste.
  • Fine chocolates using cocoa butter (the cacao bean’s natural fat) & high quality natural ingredients. Good chocolate should only contain cocoa, cocoa butter, sugar & sometimes real vanilla & soya lecithin as an emulsifier.

On my stall I have four big jars of fine chocolate buttons. I sell them by weight from 50 grams upwards. I scoop them out on demand in to a transparent satchel bag & tie it with colourful Mulberry paper string.

Currently the jars contains the following:

  • White: El Rey ICOA. The only white made with undeodorized cacao butter (deodorization is a chemical process that strips flavour). It is buttery smooth, & it isn’t cloyingly sweet like any other whites around either (others use more sugar) I truly think it is the best white the industry offers (although based on looks only, I like the Green&Blacks’ white bar with vanilla seeds – black specks on densely cream coloured chocolate looks rather lush). The ICOA is the best seller out of the four, & is very popular with the parents with small children. (By the way did you know that white chocolate is actually not really classified as ‘chocolate’? It is because it contains only cocoa butter & no cocoa solids!)
  • Milk: El Rey Caoba 41%. It is one of the darkest milks around (the usual milk chocolate has around 35% cocoa content).
  • Dark: Organic Noir Selection Belcolade 53%. It has a perfect balance between bitterness & sweetness. It is important to have ‘organic’ on my stall. It attracts so much more interests!
  • Dark: El Rey Gran Saman 70%. For the true chocoholics. Deep & intense chocolate with slight berry flavour.

You’ve probably noticed that I am El Rey-ed out in my selection. It’s plainly because my main chocolate supplier doesn’t sell any other brands that are just as worthy, & I don’t want to buy different brands from different suppliers as it’ll incur additional shipping costs for them. Besides, aesthetically I like it that all the buttons are the same size! It looks good when customers want a mixed bag.

On the subject of selection, I must let you know of the existence of a treasure cove for chocolate lovers called In’t Veld Schokoladen. It stocks chocolate bars from most of the best fine chocolate brands! Probably the best chocolate shop in Germany in terms of the huge selection on offer. That said, my less-chocolate-aware partner had a ‘bitter’ experience in their cafe when he asked the man about the wonderful hot chocolate they served… D asked them “what do you put in your hot chocolate? Is it cocoa powder and milk…” when the cafe man snapped on my poor guy & scoffed at the mere thought of using anything other than real chocolate! Maybe he was having a bad hair day… But what is all this snobbery surrounding fine chocolates about hey?!

If the subject of fine chocolate interests you, there are some specialized websites like seventypercent.com, where I swotted up & gained knowledge on the last two years. Through what they had organized during the National Chocolate Week, I have been to talks & seminars & even a factory tour at L’artisan du Chocolat, which was insightful as to how ‘fine chocolate’ can be made at a huge production like theirs. I also bought two fresh cocoa pods from their shop in Sloane Square for £7 each. One for consumption (the white pulp was sweet, the beans were acrid) & one for drying whole (which I have as a display on my stall).

Working with chocolate is initially all about trials & tribulations. Tempering (a specific method of melting the chocolate so that the end result is shiny with a crisp snap) really is tricky to master. It’s another whole new chapter if I was to write about it, so maybe that’s for future posting.

But instead, maybe I can share a recipe for a basic ganache (‘ganache‘ is a french term referring to the blended mixture of chocolate & cream) & how to make rolled truffles which does not require you to temper if you coat it with cocoa powder. Also from this I can briefly discuss how to easily make varieties of flavoured truffles with it. Please click HERE to view the recipe on another page.

I know, it was a long entry again… But… but, I really can go on forever about chocolates…! Thank you for reading til the end. Please leave a comment if you’d like to, & I’ll be hoping that you’d come back for my next installment next week!

t xx

October 21st, 2006

Tarte Tatin

tart_tatin

Hello! Well here it is, my first blog entry. I have been wanting to do a blog for sometime now, so right now I am slightly giddy with happiness. I have been running my chocolates & cakes stall for exactly a year. So much has happened within just this one year, so many interesting people I met, so much knowledge I gained. I hope to write down those types of things in this online diary.

For the readers who don’t know me, a little introduction: I am a market stall trader at Broadway Market. I am there pretty much every Saturday 9am til 4pm or until whenever I finish selling off all my items! (Come visit me!) Broadway Market is an outdoor street market with a good vibe, very London, with about 60 stalls mostly selling tasty food, & some excellent stalls selling clothing/ bags/ objects/ all sorts. I think it is the best market around in London (ofcourse I’d say that!).

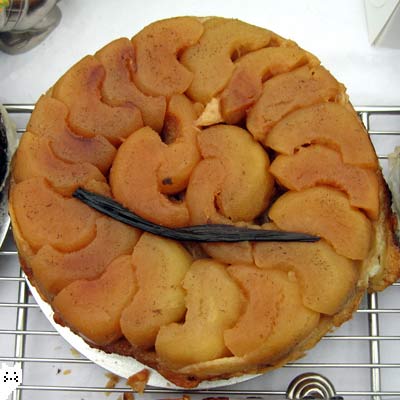
Tarte Tatin is currently my favourite tart that I have on my stall & it feels right to be the first to feature.

It is an up-side down carameralized apple tart. Wonderfully rustic, classic French tart. It is cooked for about an hour & the apples are so soft (softer than ice cream) & squishy it just melts on your mouth.

There are several versions to the history of Tarte Tatin. The one I like is this: Stéphanie Tatin, one of the two Tatin sisters from the small rural town in the Loire Valley in France, overworked & a bit ditzy, baked an apple pie up-side down by mistake but served it at their hotel anyway! I love that there is a story behind it. I also like the way the French people apparently named it ‘tarte des demoiselles Tatin‘ (the tart of two unmarried women named Tatin).

It is made with just four or five simple ingredients; apples (approximately a whopping two kilograms of!), sugar, butter, puff pastry, & an optional vanilla pod. It is simple enough to make too – just caramelize the sugar & butter, align the halved apples & cook on the hob for a while. Then place puff pastry sheet over it & bake in the oven! When cooled, flip over & hey presto, you’ve got a Tarte Tatin!

Apparently this tart can easily be made with other types of fruit – pears, peaches, prunes, quince… any fruit experimentation valid. Which makes me think maybe I should try a mixed fruit version like a four-seasons pizza! That sounds fun & could look colourful, no?

I was in a minor dilemma about wether I should share my stall recipes online, customers might stop buying my stuff & start making it themselves! But I realize that, afterall, most of the recipes I use are not exactly my own anyway, it’s a mishmash from all sorts of sources, or slightly adapted. So how can I hog it to myself? Besides, if someone trusts my recipes as much as wanting to try it themself, then it is an honour.

Tarte Tatin Recipe:

You will need the following sorted & measured before starting…, & always read the whole recipe first so that there are no surprises while baking.


  • 20cm diameter solid pan (a pan that is not loose-bottomed)
  • 80g of butter, roughly cubed
  • 160g of sugar (granulated or castor)
  • Approximately 2kg of apples, peeled, cored & halved (it’s worth experimenting with different varieties. From my experience Braeburn is better & less mushier than Cox. I’m yet to try Granny Smith)
  • 250g of puff pastry (store bought does a fine job. Wouldn’t bother making it from scratch, too much hard work! Note: Supermarkets sell in 500g, so its best to clingfilm the rest & freeze it until next time)
  • 1 vanilla pod, split lengthways & de-seeded (the best way to do this is to first use the back of the knife, press & run it down the pod & then cut. This way the pod is flat & easier to cut)
  • Roasting tray that will fit the pan
  • Foil


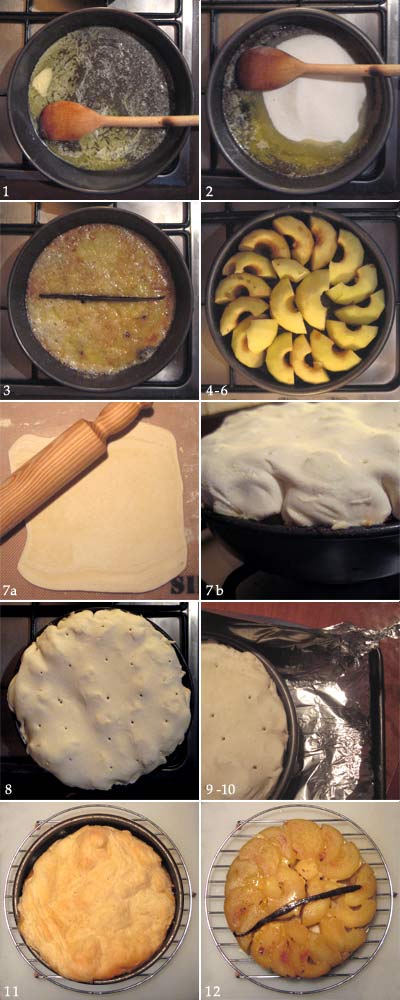
1. Melt the butter in the pan over the hob.
2. Soon as it has melted, put the sugar & the vanilla seeds in. Let the sugar dissolve.
3. Place the de-seeded vanilla pod skin in the middle of the pan.

4. Tightly align the prepared apples, first from the outside (don’t worry, there should be plenty of apples left to stuff in to the gaps at a later stage).
5. Cook on medium-high heat. The liquid should start to look carameralized & brown. Plenty of juice from the apples are now coming out & mixing with the caramel & is bubbling away. Here, be careful with your heat-control & adjust so that the juices don’t spill out. If the pan you are using has low sides, the sticky juice will spill out & make a right old mess on your cooker. (which, if it does, then it is best to wipe clean soon as you are finished – don’t wait til it hardens. It’s a back-killer to clean)
6. After a while, you’ll notice that there are spaces to shove more apples in. Now is the time to place as much apples as you can (but don’t be tempted to cut your halves in to smaller slices to fill it – it will make the final tart look like one big mass of squashed guu. You want rustic, thrown together look, & the apple shapes still intact). Now switch the hob off. Start to pre-heat the oven to 180 degrees centigrade.
7. Roll out the puff pastry so that the sheet is bigger than the pan. It does not need to be a neat circle. Place on top of the apples. Use your fork (in my case a cooking chopstick) & tuck in the ends inbetween the apple & the pan sides. Note that this tucking-in bit is very important – because if you don’t tuck, the pastry will shrink when baked & be smaller than the pan, & will not be big enough base for the apples once the tart is flipped over.

8. Pierce some breathing holes on your pastry so that hot air can escape.

9. Get any high-sided tray, like a roasting tray & line it with foil. Place the pan in it (the roasting tray is a must-have to collect the pool of more sticky caramel liquid that oozes out while the tart is in the oven – otherwise you’ll have the oven to scrub).
10. Pop it in to the pre-heated oven for 40 minutes.

11. Once done, cool it in the room as is. Once cooled, place on the top shelf of your refrierator (top-shelf because health & safety-wise any food that is to be eaten as is should be on a shelf above anything that is raw like meat, so that there is no risk of raw meat juice leaking on to your tarte). Preferably leave it there for half a day to set the shape.
12. When ready to serve, first, look at the pastry. Is it stuck to the sides of the pan? Use clean fingers to nudge it free. Now get your cake stand. Place the cake stand upside down on to your pan. Using slow & good maneuvering skills, tightly hold both stand & pan together, & flip it over. Drum-rolls. Slowly remove the pan mold. Hey presto! There should be a wonderfully formed tart in front of your eyes!

.

How to make Tarte Tatin in pictures

So anyway, I hope this first ever entry goes down well & thank you for enduring my bad writing… Please leave comments if you like to. – I’m so tempted to write more but, I now plan to have dinner with my family, & then once my kid goes up the wooden steps to bedforshire (as D likes to say!) I plan to watch the Da Vinci Code DVD we bought from Tesco with everyone, merry with a bit of sake. I know I’d probably fall asleep on the sofa half way through…

I’m thinking of uploading an entry at a once-a-week rate, so please come back around the same time next week!
t xx

October 19th, 2006

Blog starting soon.

Welcome to Coco&Me blog. I plan to post the first entry this weekend…